What Amplify is, how it's organized, and how to sign in.
What is Amplify?
Amplify is an organizing app for campaigns, nonprofits and unions. It puts phone banking, peer-to-peer texting, door-to-door canvassing, petitions, voter data, mapping and turf cutting in one place, and saves every conversation to the same record. It runs in the web browser on any phone, tablet or computer, so volunteers don't need to install anything.
Everything in Amplify fits together in the same way. Once you know these terms, the rest of the app makes sense.
corporate_fareOrganization
Your group, union or campaign committee. Users join an organization and get a role in it.
campaignCampaign
A program of work for one district and election, like a council race or a member drive. Several organizations can share one.
quizSurvey
The questions volunteers ask and the answers they record.
blockNonresponse set
The outcomes recorded when there's no survey answer, like Not home or Wrong number.
peopleGroup
Who you want to reach: voters or Community List members filtered by geography, party, vote history and more.
pentagonPolygon
A shape drawn on the map, used as turf for canvassing or as a group filter.
appsActivity
A phonebank, canvass, textbank or petition. It combines a survey, a group and a nonresponse set.
contactsCommunity Lists
Your organization's own contacts: uploads, sign-ups and opt-ins, with tags and history.
The usual order of work is:
Create a campaignarrow_forwardSurveyNonresponse setGrouparrow_forwardCreate an activityarrow_forwardVolunteers make contactarrow_forwardReports & exports
Ideas: what you can do with Amplify
Short, real-world examples of how organizers use Amplify's tools together. Each one links to the guide where it's explained.
Your role belongs to an organization, not to your account. The same person can be an owner in one organization and a volunteer in another. Amplify always uses your role in the organization you're currently working in.
Role
What they can do
Volunteer
See the organization's active campaigns and work in their activities: call, text, canvass and collect petition signatures.
Everything an administrator can do, plus: accepts the Terms of Use for the organization, changes administrators' roles, removes any other member from the organization regardless of role, and can transfer ownership. Each organization has one owner.
Data manager
A per-campaign permission given to administrators or owners. Data managers manage campaign permissions, campaign billing, campaign-wide groups and everyone's data in the campaign. The person who creates a campaign is a data manager by default.
Who can do what
Task
Volunteer
Admin
Owner
Work in activities you're assigned to
✓
✓
✓
Create campaigns, surveys, groups and activities
–
✓
✓
Reports, summaries and exports
–
✓
✓
Community Lists
–
✓
✓
Approve join requests
–
✓
✓
Change a volunteer's role or remove them
–
✓
✓
Change an administrator's role or remove them
–
–
✓
Transfer ownership
–
–
✓
Accept the Terms of Use
–
–
✓
Organization settings, phone numbers and billing
–
✓
✓
Data managers (administrators or owners with that campaign permission) can also manage the campaign's permissions, see campaign billing, make campaign-wide groups, and see All orgs results in summaries and exports. Editing a campaign's settings is for administrators and owners of the organization that created it. Some features also need a particular plan.
Throughout these docs, a Admin label shows who can use a feature, and a Plus plan label shows which plan it needs.
Plans and what they include
Every plan includes unlimited users. Your plan appears next to your organization's name on the home page.
Feature
Free
Lite
Core
Plus
Keep access to past data
✓
✓
✓
✓
Team members, campaign search, permissions and billing
–
✓
✓
✓
Voter data, maps, groups, reports and exports
–
✓
✓
✓
Create activities (canvassing, petitions)
–
–
✓
✓
Phone banking and texting (calling pool and texting numbers)
–
–
–
✓
Calling and texting usage is billed on top of the subscription. See Billing. To change plans, contact Particle 64.
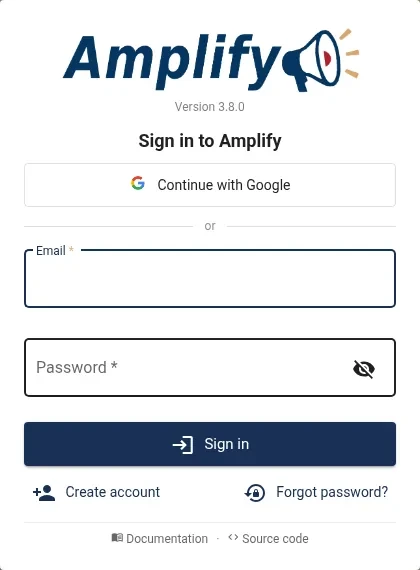
The sign-in window also shows the app version, plus links to this Documentation and to Amplify's Source code. If you see a version warning, see A newer version of Amplify is available.
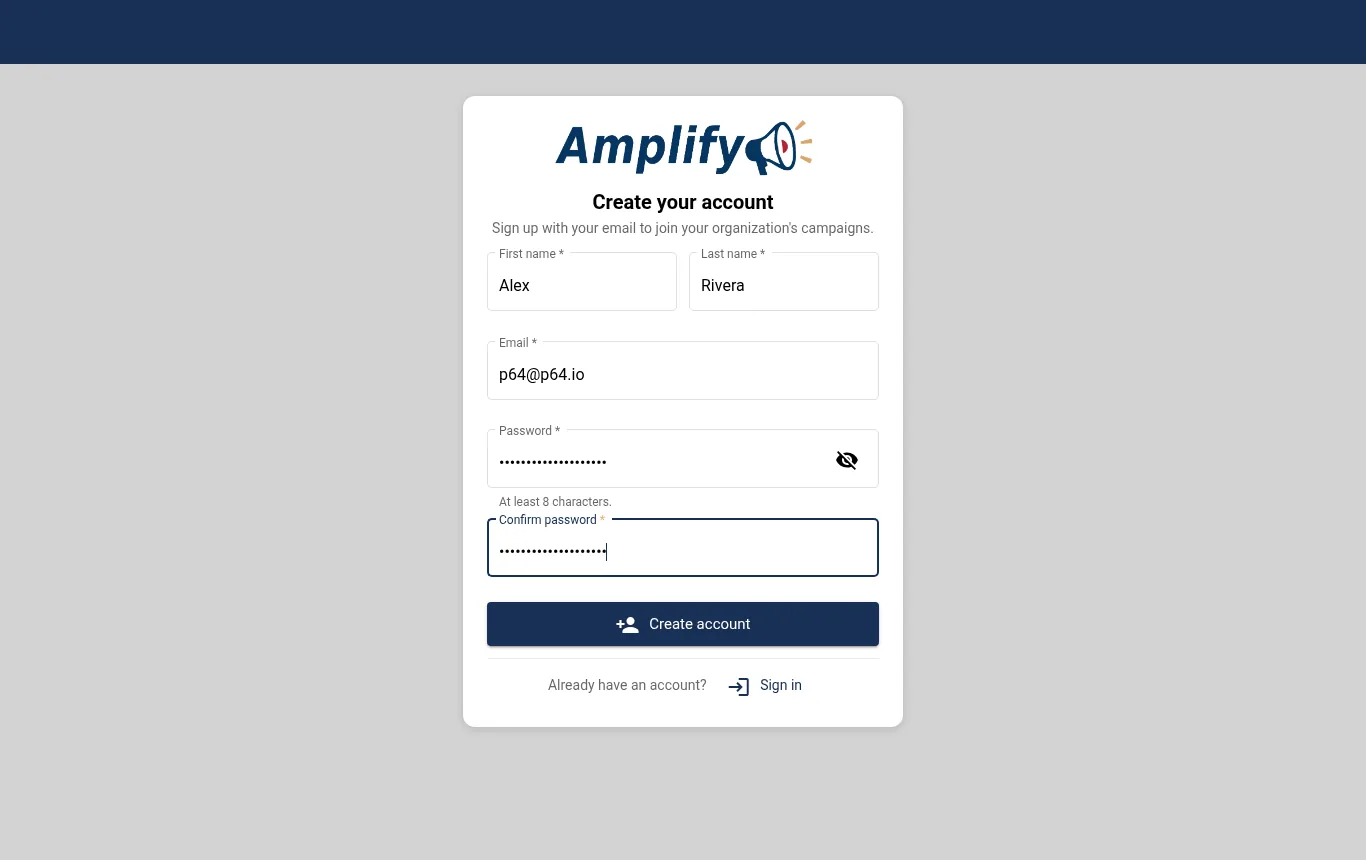
Creating an account with email.
Reset your password
On the sign-in window, click Sign in with email, then Forgot password?
Enter the email you sign in with and click Send reset link.
Open the email and click the link. Enter a new password twice and click Save new password.
schedule
Reset links work for 10 minutes and only once. If yours has expired, click Request a new link. If the email doesn't arrive, check your junk or spam folder.
Accounts that sign in with Google don't have an Amplify password. Use Continue with Google instead.
Join an organization
You need to belong to an organization before you can see its campaigns.
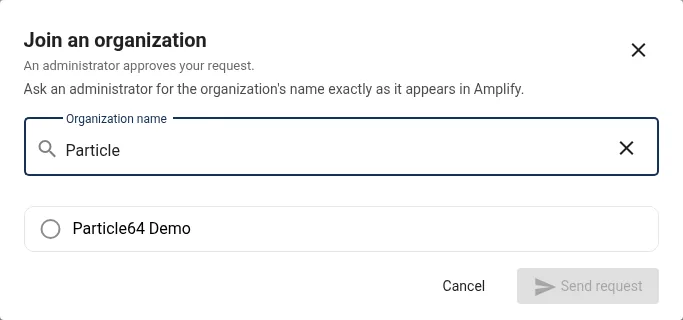
Search for your organization by name, select it and send the request.
On the home page, click Find or request an organization. If you're already in one, open view_listMy Organizations and click Request to join an organization.
Type at least a few letters of the organization's name. Ask your organizer for the name exactly as it appears in Amplify.
Select it and click Send request.
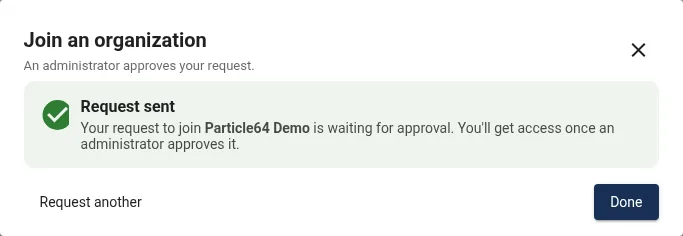
An administrator of that organization approves your request. Once approved, the organization's campaigns appear on your home page.
link
If your organizer sent you a volunteer sign-up link, open it instead. It takes you straight to the activity.
The request waits for an administrator to approve it.
Switch between organizations
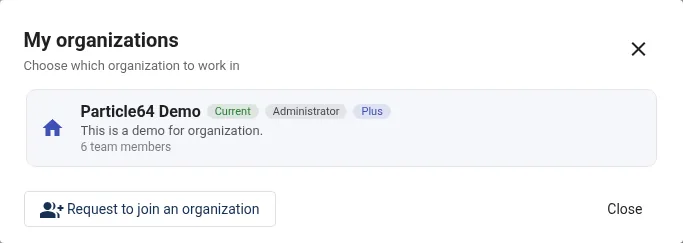
If you volunteer with more than one group, click view_listMy Organizations on the home page. The list shows your role in each one and how many team members it has. Click an organization to switch to it. Your current organization is marked Current.
My Organizations shows your role and plan in each organization.
Find your way around
The navy bar at the top of every page has the same buttons. On small screens only the icons show.
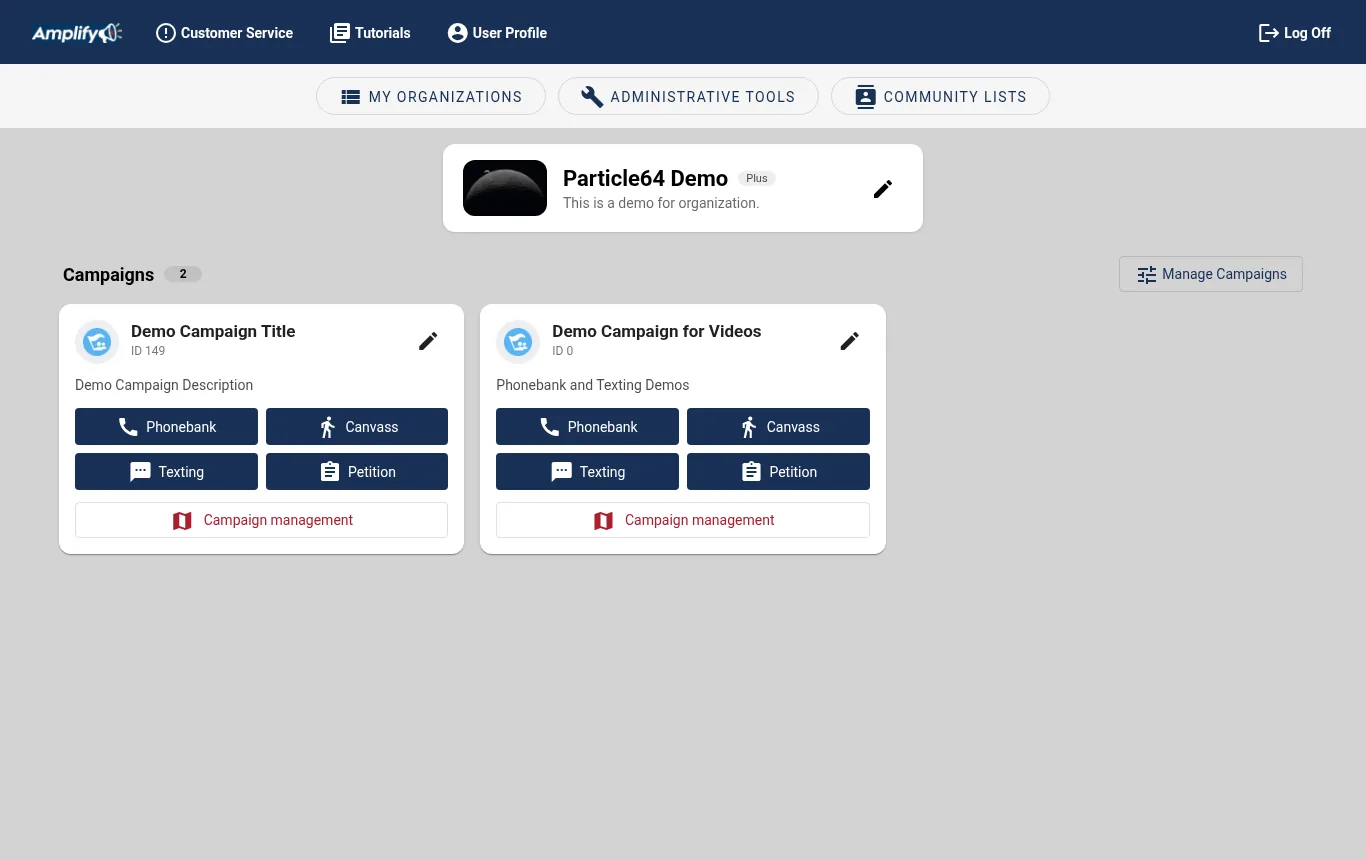
The home page: your organization, its active campaigns, and a button for each activity type.
replyBack
Returns to the previous page.
error_outlineCustomer Service
Sends a message to the Amplify team. See Get help.
my_library_booksTutorials
Opens this documentation.
account_circleUser Profile
Change your first and last name, and see the organizations you belong to and your role in each. Your sign-in email can't be changed here.
logoutLog Off
Signs you out.
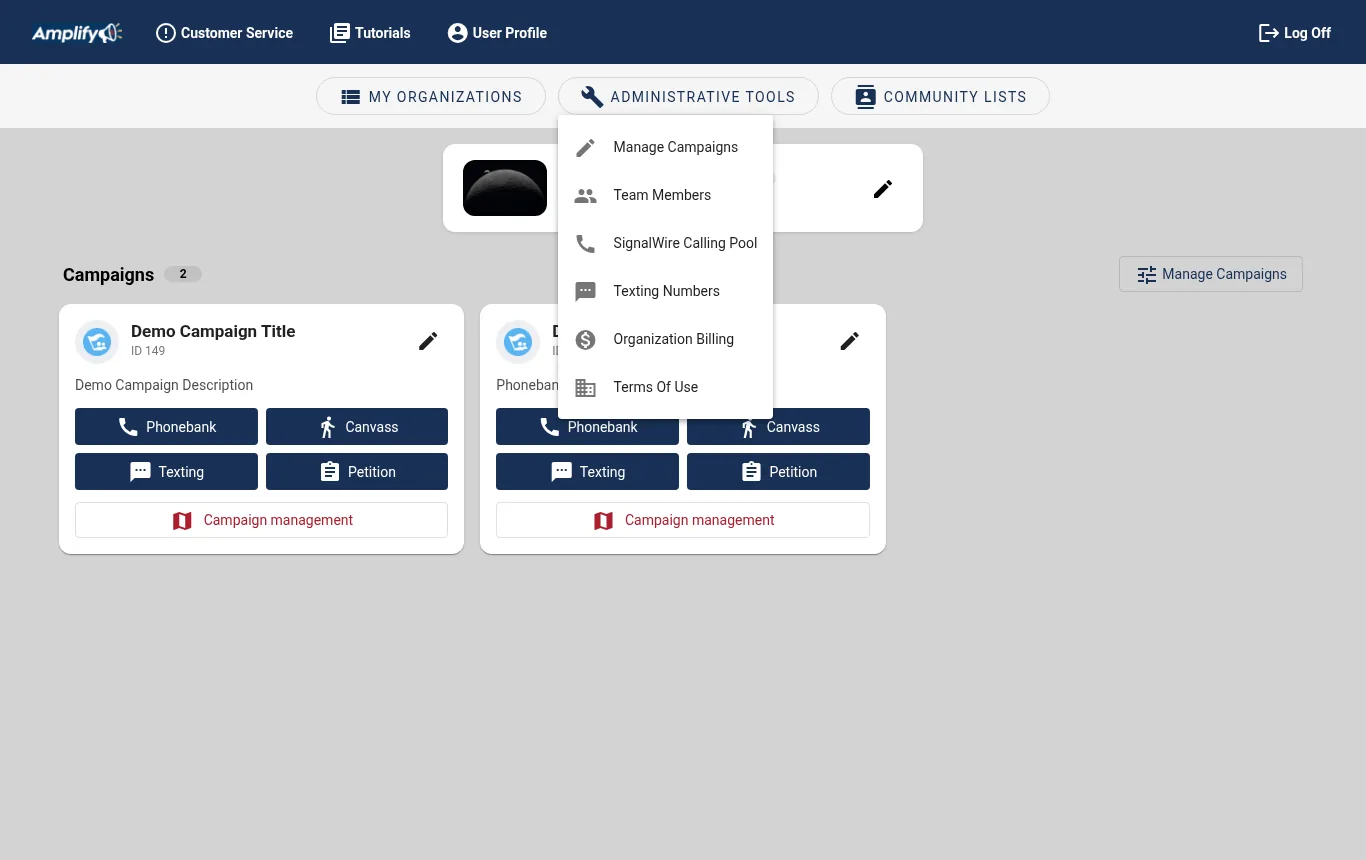
On the home page, your organization's name, logo and plan are at the top, with its active campaigns below. Each campaign card shows its campaign ID and buttons for its activity types. Administrators also see Administrative Tools, Community Lists and a Campaign management button on each card.
install_mobile
On a phone, use your browser's Add to Home Screen option to open Amplify like an app.
volunteer_activism
For volunteers
Make calls, send texts, knock doors and collect signatures.
Find your activity
On the home page, find your campaign's card. Ask your organizer which campaign to use if there's more than one.
Click the activity type: callPhonebank, directions_walkCanvass, smsTexting or assignmentPetition.
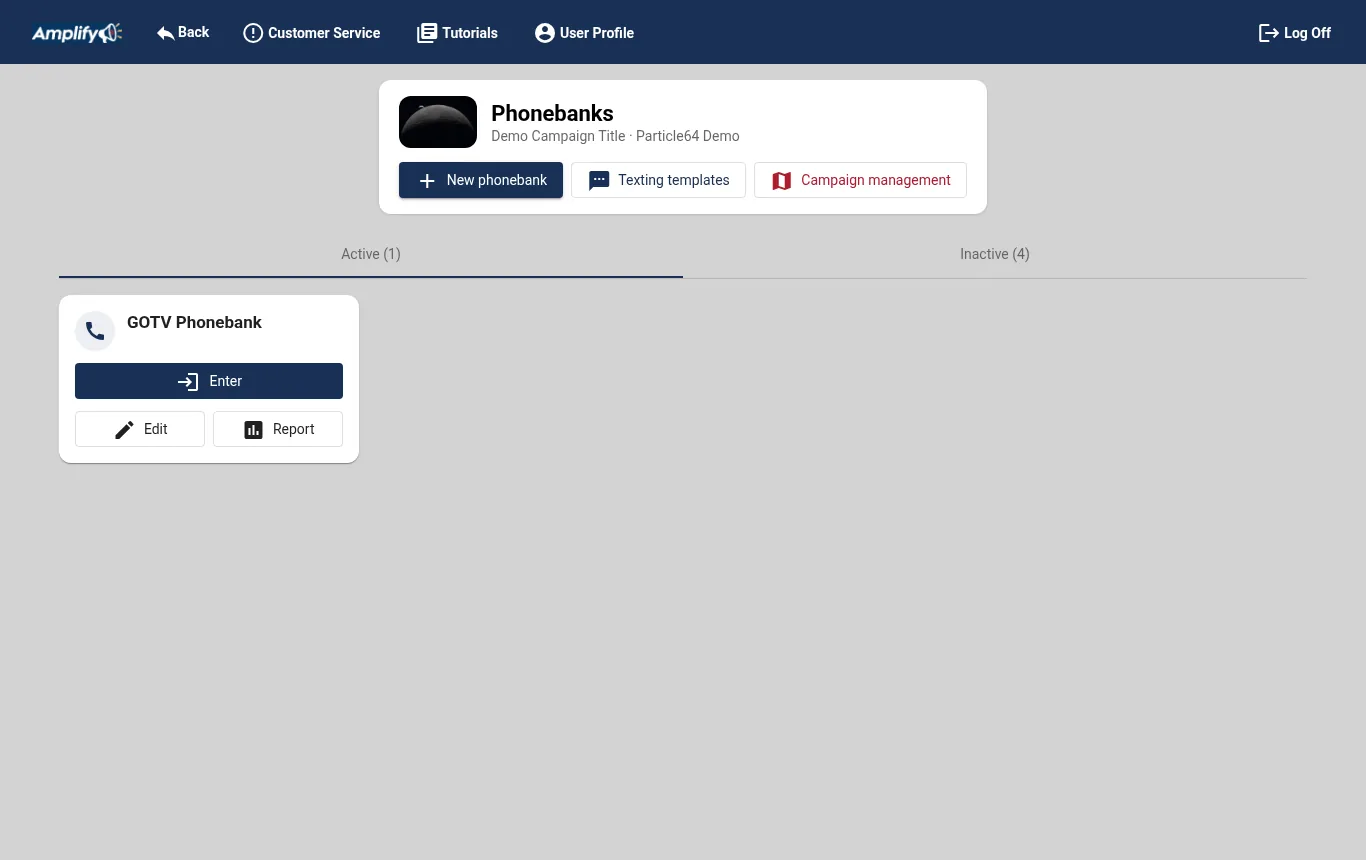
The dashboard lists every active activity of that type. Click loginEnter on the one you were assigned.
If an activity says Preparing contacts…, Amplify is still loading its list. The Enter button turns on when it's ready, usually within a minute. If it's still preparing after 10 minutes, the dashboard stops checking and says Still preparing households. Refresh later or contact your organizer. Click Check again to look again.
If the activities can't load, the dashboard says why, for example Couldn't load the activities: the server didn't respond. Click refreshRetry.
pause_circle
If a campaign card says Paused, its organizers have put it in sleep mode and its activity buttons are turned off for now.
An activity dashboard. Click Enter to start.
Phone banking
VolunteersPlus plan
Amplify calls from your browser, so you don't need to dial or use your own phone number. Use a computer or phone with a microphone, and a headset if you have one.
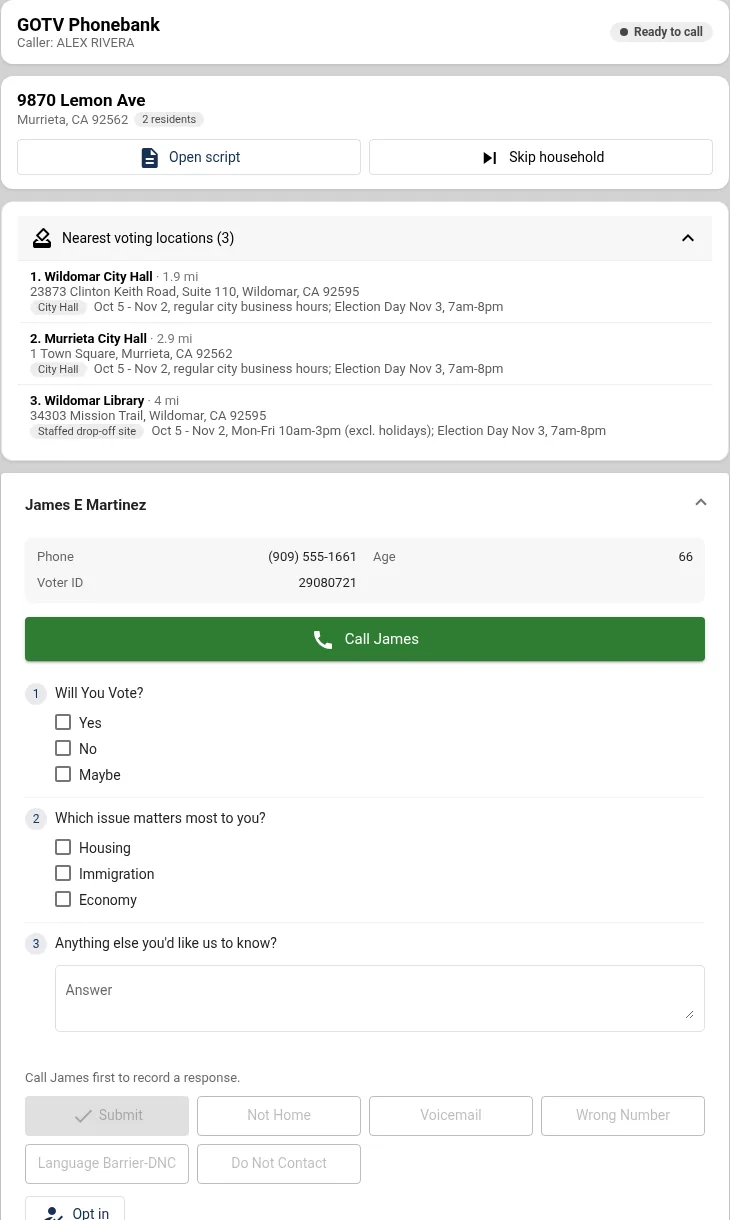
A phonebank household: script, nearest voting locations, the resident's survey and the nonresponse buttons.
Enter the phonebank. The top card shows the phonebank's name, your name as the caller, and your call status.
Amplify loads one household at a time. You'll see the address and everyone at it who has a phone number. If the phonebank has a script, click descriptionOpen script to read it in a new tab.
Open a resident and click callCall. The first time, your browser asks to use your microphone. Click Allow.
While you talk, fill in the survey. Single-choice questions take one answer, multiple-choice questions can take several, and notes questions take typed answers.
Click call_endHang up, then checkSubmit. If you didn't get answers, click the matching nonresponse button instead, like Not home or Wrong number.
When everyone in the household has a result, Amplify loads the next household.
Good to know
You need to call someone before you can record a response for them. Each resident shows Called this pass or Responded as you go.
To submit, answer at least one multiple-choice question, or pick a nonresponse.
The resident card shows their phone number and age. On the Twilio calling screen it also shows voting propensity, and party and other partisan fields if the campaign turns on partisan data. On the SignalWire screen (the default for new organizations) it shows the Voter ID instead.
skip_nextSkip household moves on without recording anything. Someone else can call that household later.
On the Twilio calling screen, if the phonebank has a patch-through number, phone_forwardedPatch through appears once a call connects. It transfers the person to that number, for example a campaign office or a ride-to-the-polls line. The SignalWire screen doesn't offer patch-through.
On the Twilio calling screen, you hear ringing while the person's phone rings (or the phone company's own ringing or recorded message, if it sends one), so you're never left in silence while it rings. Your call status flashes when someone (or their voicemail) picks up. If your connection is weak, a notice says Your internet connection is unstable, so audio may cut out. Close other tabs or apps using the internet, or move closer to your Wi-Fi.
If an organizer starts a new pass while you're calling, a notice tells you, and your calls are recorded on the new pass.
On the SignalWire screen, calling sessions expire after a while. If you see Your calling session expired, refresh the page to keep calling.
If the campaign shows voting centers, the how_to_voteNearest voting locations panel lists up to two vote centers and one ballot drop-off in the household's county, with distance. Each is marked Vote center (vote in person or drop off a ballot) or Ballot drop-off (drop off a ballot only), with its room if there is one, and its hours, shown separately for early voting and Election Day when the county lists both. If the household's map location is only approximate, you'll see Voting locations not shown: this address's map location is approximate instead.
On the Twilio calling screen, if you see Calling is still starting up, wait a few seconds and click Call again. If it doesn't start, refresh the page.
On the Twilio calling screen, if a number is invalid, not in service or outside the US, you'll see a message saying so. Choose a non-response such as Wrong Number and move on.
If you see All call numbers are in use, every number in your organization's calling pool is busy. Wait a moment and try again, or ask an administrator to add numbers.
On the Twilio calling screen, if the person declines, is busy or doesn't pick up, you'll see The call wasn't answered. Choose a non-response such as No Answer, or try them again later.
When the list is finished you'll see Everyone on this list has been contacted.
If the phonebank allows it, you'll also see smsOpt in & text or how_to_regOpt in. See Opt-ins and consent.
Canvassing
VolunteersCore or Plus plan
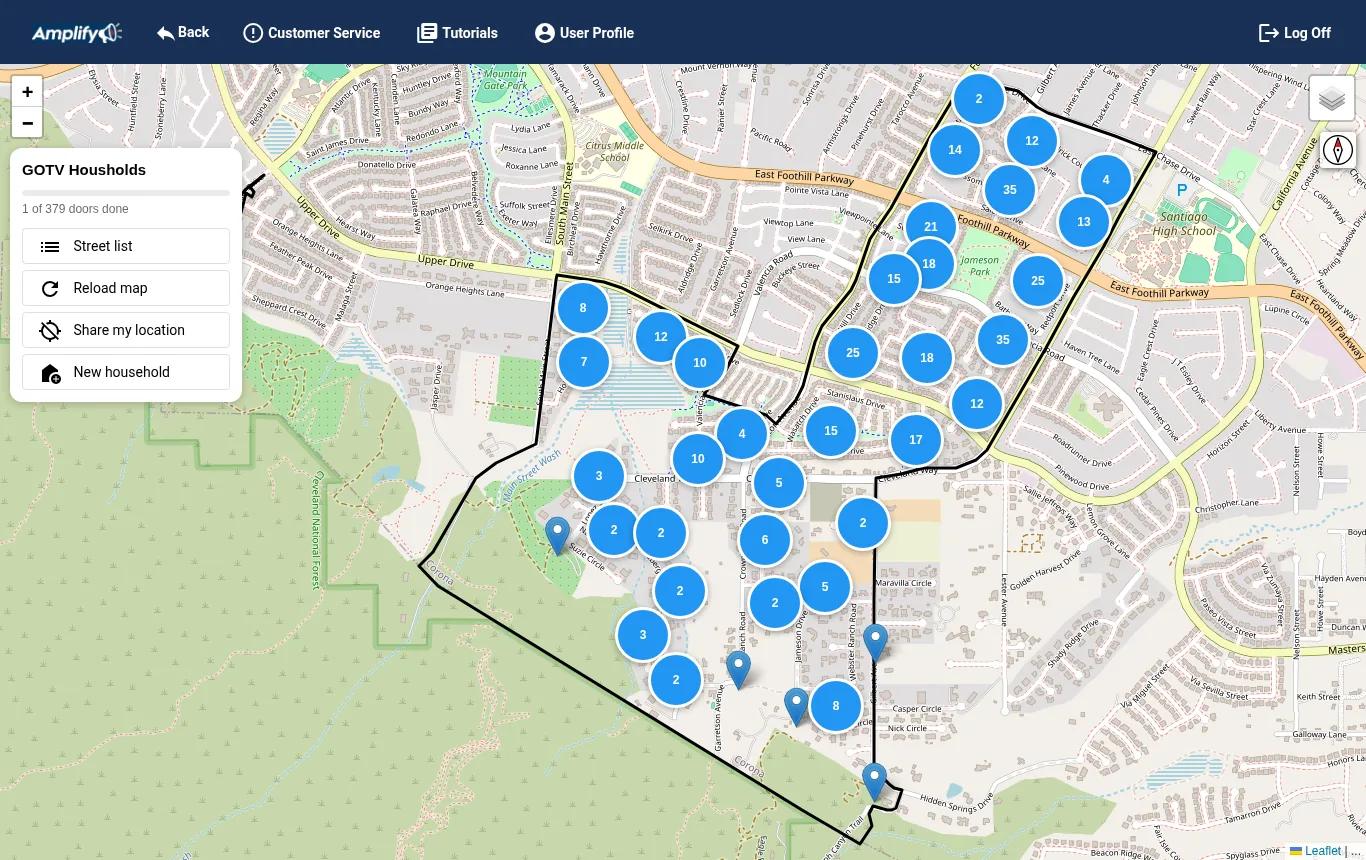
A canvass shows your turf on a map, with a pin for every building to visit.
The canvass map: numbered clusters, blue and green pins, and the turf boundary.
The canvass map
Blue pin: a single home to visit.
Purple pin: a building with several units, like an apartment complex.
Green pin: done. Every unit is complete or passed.
Orange pin: a household a canvasser added to the map (see below).
Faded pins have an approximate location. The address is right, but the pin may be a few houses off.
When zoomed out, nearby pins group into numbered circles. A circle turns green when everything in it is done. Zoom in or tap a circle to see the pins.
Hover over or tap a pin to see the address and how many people live there. The progress bar shows how many doors are done.
Knock a door
Tap a blue or purple pin. For a building with several units, pick the unit. Each one shows To do, Passed or Complete.
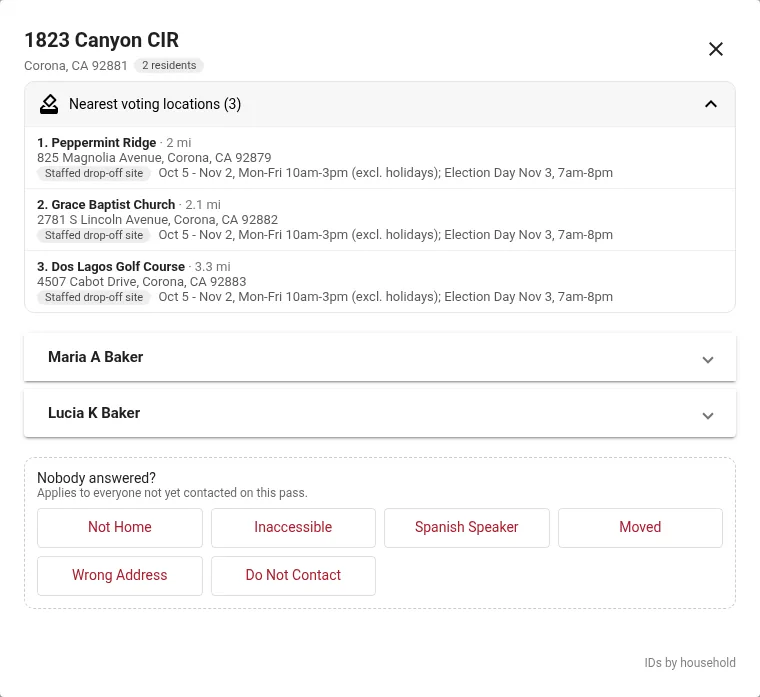
The household window lists everyone at the address. If the campaign shows voting centers, it also lists the nearest voting locations (up to two vote centers and one ballot drop-off in the household's county, with their hours), unless the address's map location is approximate. Then it says Voting locations not shown. Open a person to see their age and voting propensity, then ask the survey questions.
Tap checkSubmit, or tap a nonresponse such as Not home for that person.
If nobody answers the door, use the red buttons under Nobody answered?. They apply the outcome to everyone at the address who hasn't been contacted on this pass.
If you see The server didn't respond, so this response may not have been saved, close the door and reopen it to check before you submit again. Otherwise you could record the same answer twice.
If the canvass can't load, a red banner above the map says why. Tap Retry.
To add someone who isn't on the list, like a new roommate, tap person_addNew person (shown when the canvass offers opt-ins). The New community member form takes their name, phone and email, texting and email opt-ins, tags, and the canvass survey, so you can record their answers at the same time. The address comes from the household; add a unit if they have one.
Add a home that isn't on the map
When the canvass offers opt-ins, you can add a household that isn't in your list, like a new building:
Tap add_homeNew household (New home on a phone).
Tap the map where the household is. Tap Cancel to stop.
The new door opens with its address. Add the people who live there with the New community member form.
The household shows as an orange pin marked Added by canvasser, exactly where you tapped.
Tools
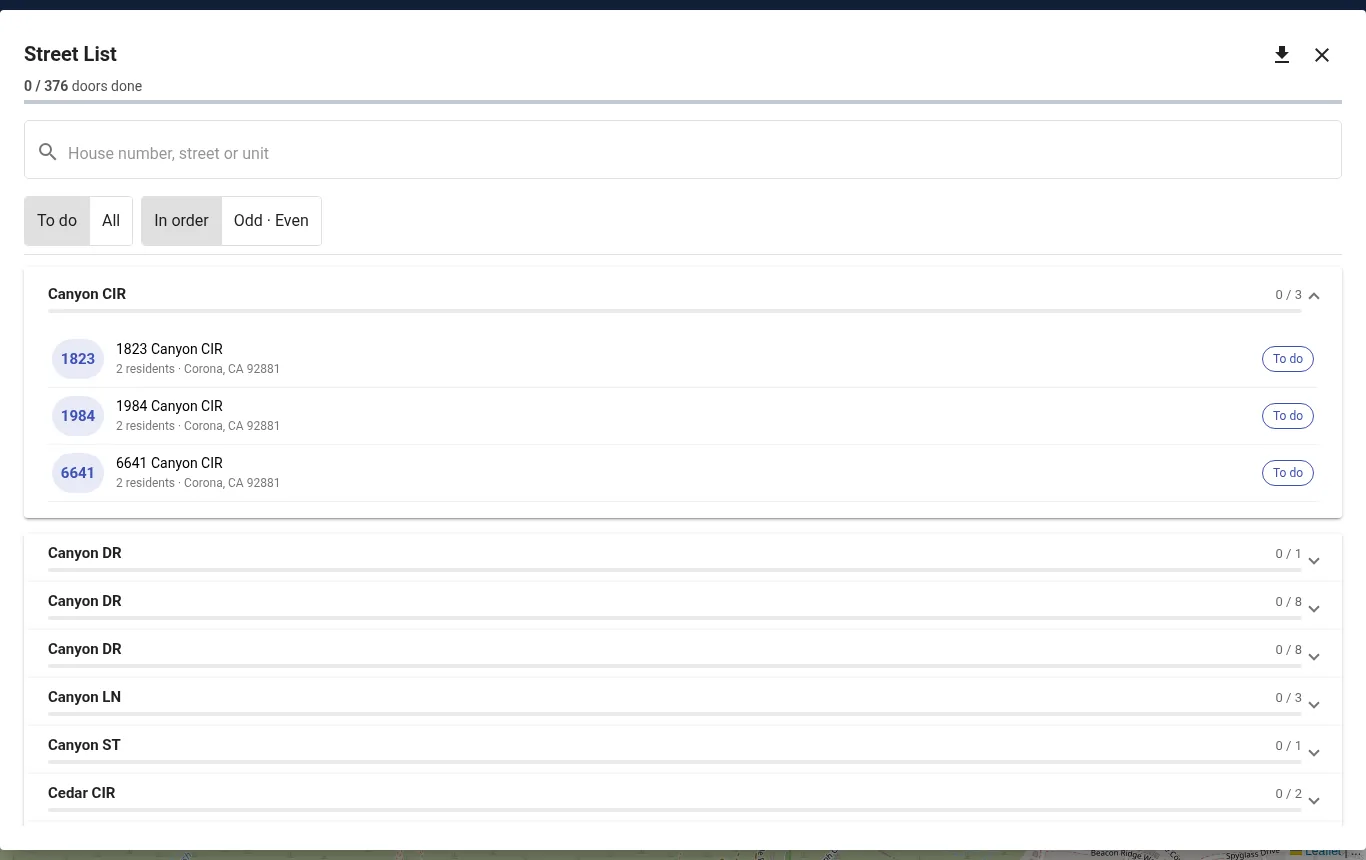
listStreet list
A list of every street in your turf with progress for each. Search by house number, street or unit, show only To do doors or All, and sort In order or Odd · Even to work one side of the street at a time. Tap a door to open it. Tap download to download a printable walk list. If the list can't load, tap Retry.
refreshReload map
Gets the latest results, including doors other canvassers finished. Reload every so often when you're canvassing with a team.
my_locationShare my location
Optional. Shows you, and anyone else in this canvass who's sharing, on the map. See Share your location below.
On a phone, these tools sit in a bar at the bottom of the screen, within reach of your thumb, with shorter names: List, Reload, New home, Location (Sharing while it's on) and Follow/Unfollow.
Share your location
Location sharing is optional. You can knock every door without it. Turn it on when you want to see where you are on the map, or when your team wants to see each other in the field.
Tap location_disabledShare my location (Location on a phone). The first time, your browser asks for permission. Tap Allow.
The button changes to my_locationSharing location (Sharing on a phone), and a location marker appears where you are.
To keep the map centered on you as you walk, tap gps_fixedFollow me (Follow). It zooms in close to your position and re-centers about every 30 seconds. Tap Stop following (Unfollow) to move the map yourself.
Tap the button again to stop sharing.
Who can see you
Everyone sharing in the same canvass sees each other. While sharing is on, your marker appears on the map of every other canvasser in this activity who also has sharing on, including volunteers from partner organizations. You see theirs the same way.
Hover over or tap a marker to see whose it is and when it was last updated, for example Sharing location · 4:12 PM · 2 min ago. Your own marker looks the same as everyone else's.
People who don't have sharing on don't see anyone's location, and nobody sees theirs.
Only this canvass is affected. Other activities and your organization's reports don't show locations.
How it updates
Markers refresh about every 30 seconds. Your position is sent when you move. If you stand still, it's re-sent every 5 minutes so you stay on the map.
When you tap the button to stop sharing, or leave the canvass page, your marker is removed. Others see it disappear at their next refresh.
If you close the browser or your phone goes to sleep while sharing, your last position can stay on others' maps for up to an hour, marked with how long ago it was updated. Stop sharing before you put your phone away.
If you deny location permission, sharing turns off and Amplify explains how to allow it in your browser settings.
groups
Canvassing as a team? Have everyone turn on sharing at the start so you can split up the streets and see who's nearby. Use Reload map to see the doors your teammates have finished.
Fix a mistake
Tap a green pin to review what was recorded at that door: each response, who recorded it, and when. To canvass it again, tap restart_altReset door. This deletes those responses.
warning_amber
Only choose Do Not Contact when a person asks not to be contacted. It removes them from the campaign's future groups and activities.
A household: nearest voting locations, each resident, and the Nobody answered? buttons.The street list, with progress for each street. Tap a door to open it.
Texting
VolunteersPlus plan
Textbanks send a prepared first message to each person. You press send for every text, and you handle the replies yourself.
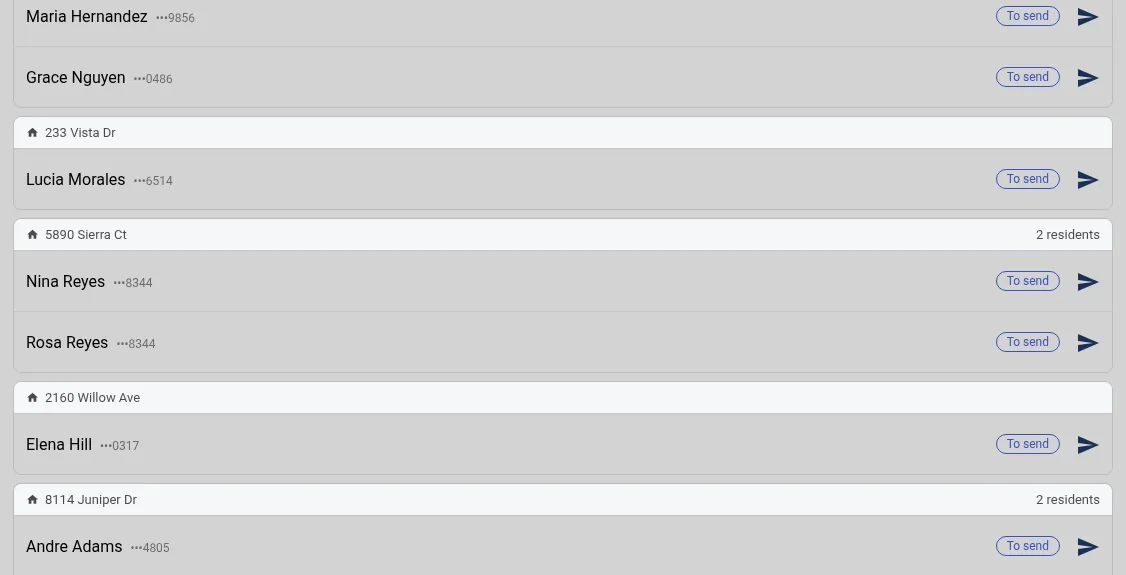
Loaded households. Each person shows their status and a send button.
Send first texts
Enter the textbank. The header shows the number you're texting from and whether an image is attached.
On the Send tab, click playlist_addLoad more households. Amplify assigns you a batch of people that no one else will text. When several people share a phone number, only one of them is loaded, so each number gets one text.
Open Message preview to see what will be sent. Names are filled in for each person, and an attached image is shown above the message.
Click send next to a person to text them, or sendSend all to go through the batch. You can stopStop at any time.
Load more households when the batch is done. When there's no one left, you'll see Activity completed.
Each person shows To send, Sent, Replied or Already contacted.
Reply to conversations
Open the Conversations tab. The red badge counts people waiting for a reply, and each one has a dot in the list.
Click a conversation to read it. Type a reply and press send, or tap a quick response to use it.
When the conversation is over, click doneFinish. The Finish identification window opens with the person's name and the activity.
Under Survey, record what they told you and click checkSubmit. You need at least one multiple-choice answer. If you couldn't identify them, click a button under Couldn't identify them? instead. That finishes the conversation without survey answers.
If the activity offers opt-ins, how_to_regOpt in is at the bottom of the same window. Cancel closes it without saving.
schedule
People often reply hours later. Check Conversations again after you finish sending.
Reply notifications
When you enter a textbank, your browser may ask to show notifications. If you allow it, Amplify notifies you when someone replies to one of your texts, even when the textbank isn't open, as long as your browser is running. You can turn this off at any time in your browser's site settings.
If you see No texting number is assigned to this activity, ask an administrator to pick a texting number for it.
If the textbank can't load, click refreshRetry, or Back to activities to pick another one. If it says This activity couldn't be found. It may have been deleted., ask your organizer which activity to use.
A new textbank shows Preparing contacts until its list is ready.
Collecting petition signatures
VolunteersCore or Plus plan
A petition is a sign-up form you fill in with someone, in person or on the phone. Signers are added to your organization's Community Lists, and can be matched to the voter file.
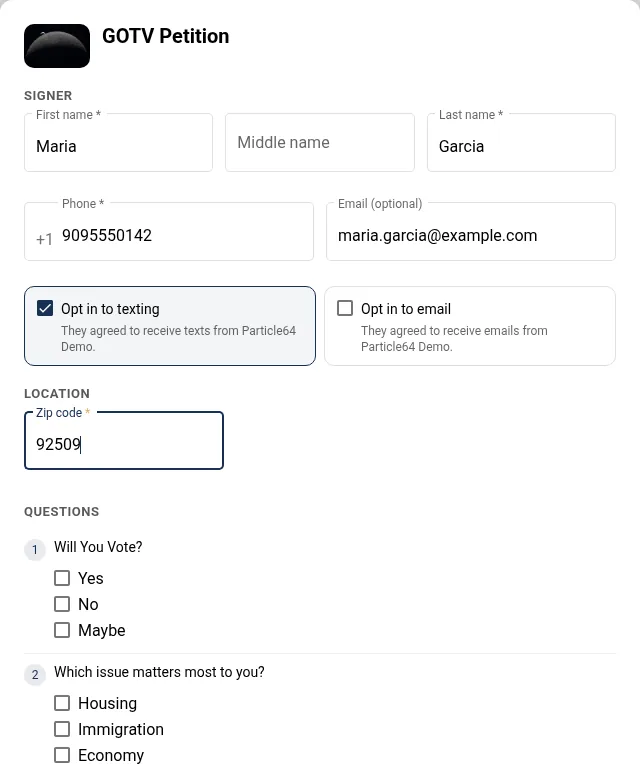
A petition signature with texting consent and the survey questions.
Under Signer, enter their first and last name and phone number. Email is optional or required, depending on how the petition was set up.
Check Opt in to texting and Opt in to email only if they agree to receive them.
If the petition offers tags, you can Add a tag, like Volunteer. For a tag with values, pick the value too.
Enter their zip code. If the petition asks for an address, start typing the street and pick a suggestion to fill in the city and zip.
Answer the questions, then click drawSave signature.
The count at the top shows how many signatures you've saved. If texting is turned on for the petition, smsSend Text sends the signer the petition's first message. It works once their first name, phone number and texting consent are filled in, before or after you save.
If the petition can't load, a banner at the top says why. Click Retry.
lightbulb
Use case: Turn a farmers-market table into a contact list. Use a petition with Check voter file on and texting opt-ins. Every signer is added to your Community Lists and matched to their voter record. The ones who opted in can be texted later, for example with an invitation to your next event.
Opt-ins and consent
When an activity offers opt-ins, you'll see how_to_regOpt in (or smsOpt in & text when texting is on) for each person. Use it when someone wants to hear from your organization again.
Click Opt in. If they're already on your Community Lists, Amplify says so and shows which consents they've given.
Check Opt in to texting and/or Opt in to email, only for what they agreed to.
Confirm their phone number (needed for texting) and email (needed for email). Add tags if the activity offers them, with a value for tags that have values.
Click save. With texting on, click smsSend text to send the activity's first message to them.
gavel
Texting someone from a phonebank or canvass needs their consent. Amplify won't send a text until Opt in to texting is checked.
lightbulb
Use case: The new roommate at the door. The person who answers isn't on your list. Instead of writing their name on paper, tap New person, add them with their consent, and they're in your Community Lists before you reach the next house.
Volunteer cheat sheets
One page per activity type, to print for a training or hand out at a phone bank or canvass launch. Click picture_as_pdfPDF on a card to open it as a one-page PDF you can print, download or email to volunteers.
Sign in at amplifyvote.com, click Canvass on your campaign, then Enter.
Blue pins are homes to visit. Purple pins are buildings with several units. Green pins are done.
Tap a pin, then a person, and ask the survey questions. Tap Submit.
Nobody home? Use the buttons under Nobody answered? to record the whole household at once.
Use List to work street by street, and Reload to see doors your team finished.
Optional: tap Location to see yourself on the map, and Follow to keep it centered on you. Teammates in this canvass who also share will see you, and you'll see them.
Remember: only choose Do Not Contact when a person asks not to be contacted. If you shared your location, turn it off before you put your phone away.
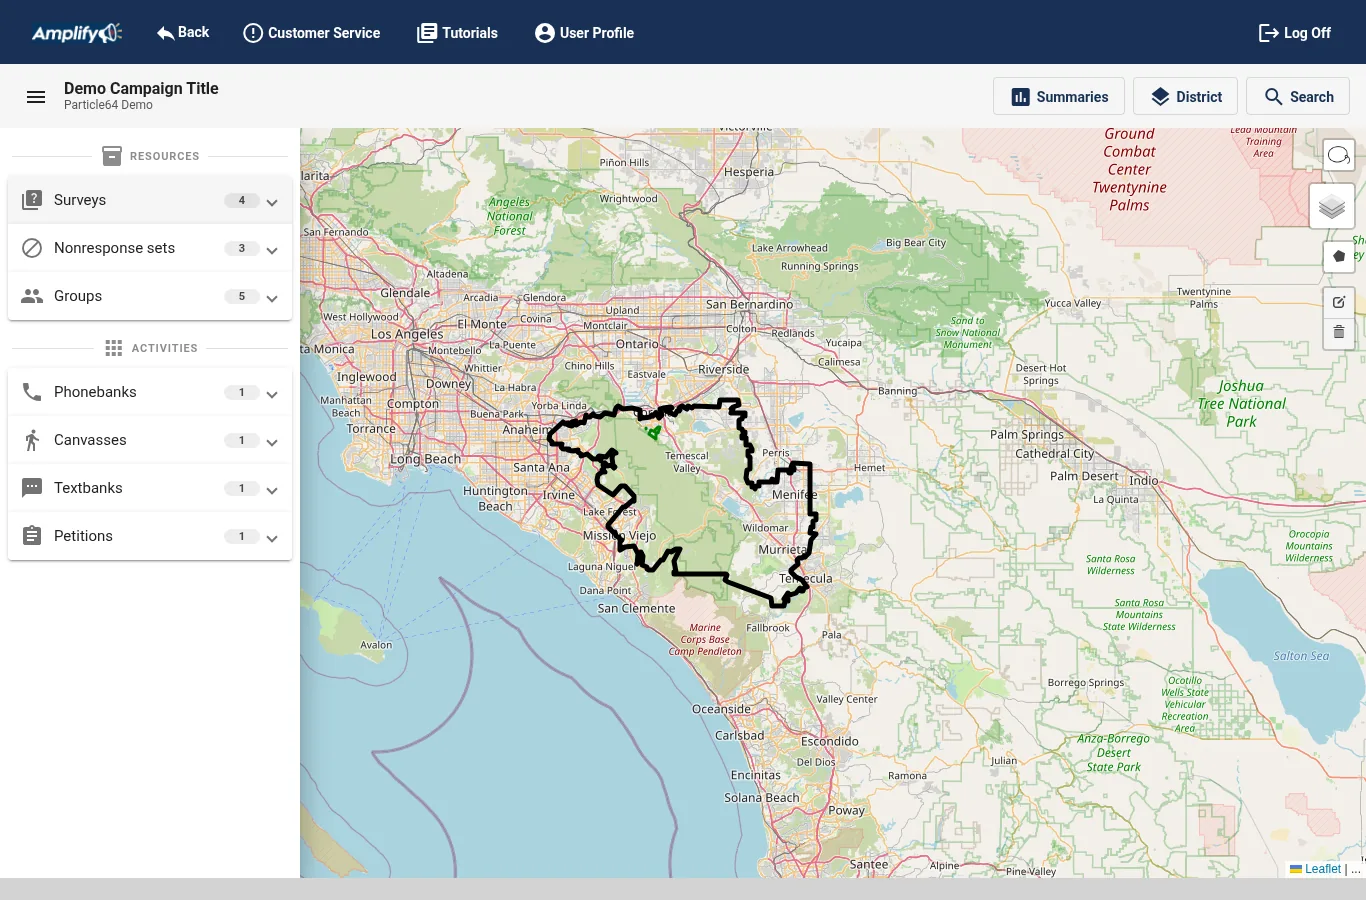
Under Resources: Surveys, Nonresponse sets and Groups. Under Activities: Phonebanks, Canvasses, Textbanks and Petitions. Each panel shows a count, a create button, your items, and a link to the rest. Click menu to show or hide it.
Map
The campaign's district boundary, polygons and precincts.
checklist
Every activity needs a survey. Phonebanks, canvasses and textbanks also need a group and a nonresponse set. Set those up first.
Map layers and precinct data
Use the layers control in the top right of the map to switch between Streets and Satellite base maps, and to show or hide overlays:
Campaign Boundary: the districts chosen for the campaign.
Your organization's polygons, and polygons from other organizations on the campaign, each in its own color.
Registration Precincts: every registration precinct in the campaign.
Vote Centers and Ballot Drop-offs: every vote center and ballot drop-off inside the campaign boundary, shown when the campaign has Show nearest voting centers turned on. Hover over a dot to see its address and hours. A place that is both shows in both layers.
With precincts on, each precinct is shaded blue by its share of Democratic voters (darker means a higher share), and more solid where there are more households. Hover over a precinct to see registered voters, households, and a party bar with Dem, Rep, DTS/NPP and Other.
If the boundary, polygons, precincts or voting locations can't load, a message at the bottom of the screen says so. Click Retry. If it says This campaign has no boundary, so the map can't be centered or show polygons., contact Particle 64.
Draw turf with polygons
AdminOwner
Polygons are areas on the map. Use them to cut canvassing turf, or as a geography filter in groups. There are three ways to make one:
Draw it
Click the polygon tool in the top right of the map. Click the map to place each corner, and click the first corner again to close the shape.
Lasso precincts
Turn on Registration Precincts, then use the lasso tool to circle the precincts you want. Every precinct the lasso touches is merged into one shape.
From one precinct
Double-click a precinct.
A new shape shows in red. Click it to open Create polygon:
Give the polygon a name and an optional description.
Under Who's inside, choose a campaign-wide rule set, or Everyone (no filters), and click calculateGet estimate to count the households, residents, phones and Textable phone numbers (not landlines or numbers that failed before; a number shared by several people counts once) inside. The map shows a pin for each household, grouped into numbered circles when zoomed out. Use the control in its top right to switch between Streets and Satellite.
To use it right away, turn on Also create a group for this polygon and name the group.
Click create.
speed
Keep each canvass to about 1,000 households so it loads quickly on phones. Cut a large area into several polygons, one canvass each.
Edit, archive and the allocation list
Smaller polygons are drawn on top of larger ones, so you can reach each one. Hover over a polygon to outline it. If other polygons are under the pointer, the tooltip lists them under Also here.
Double-click a polygon to edit it. Where several of your polygons overlap, a list opens first: choose the one to edit. You can rename it, add notes, see which groups and activities use it, get a new estimate, and create another group from it. You can archive a polygon once nothing active uses it.
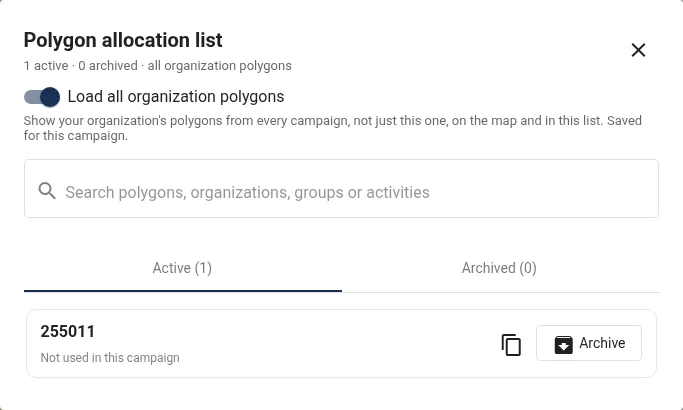
layersDistrict › Polygon Allocation List lists every polygon with the groups and activities that use it. Search it, open an activity's report, copy a polygon's ID, and archive, restore or delete your own polygons. Turn on Load all organization polygons to include your organization's polygons from other campaigns.
Use case: Give each team captain their own turf. Cut a council district into eight polygons of about 1,000 households, turn on Also create a group for each, and make one canvass per team captain. Teams never knock the same door. In a coalition, Restrict geographic grouping keeps partner organizations from drawing over each other.
The polygon allocation list.
Surveys
AdminOwner
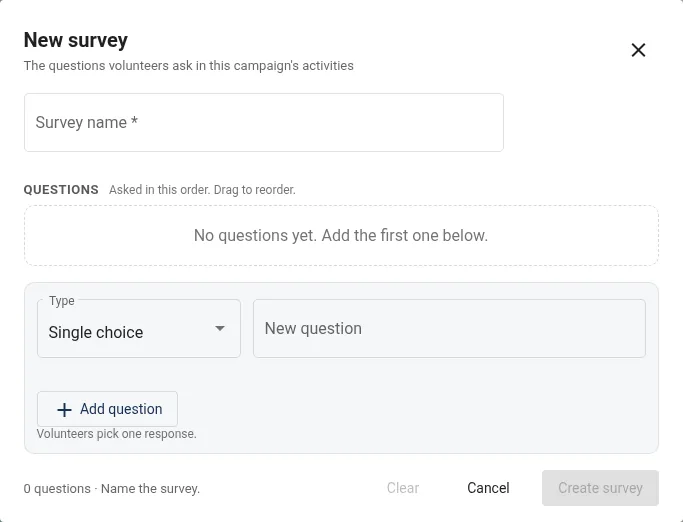
A survey is the list of questions volunteers ask and the answers they record. In the side menu, open Surveys and click addCreate a survey.
Creating a survey.
Name the survey.
Choose a question type, type the question and click Add question.
For choice questions, add each answer with Add.
Drag questions and answers to put them in order.
Click Create survey.
Question type
How volunteers answer
Used in reports and groups
Single choice
Pick one answer.
Yes
Multiple choice
Pick several answers.
Yes
Notes
Type a free-text answer.
Exports only
When several organizations share a campaign, use Only show to on a question to show it to some organizations only. Leave it empty to show it to everyone.
Editing a survey with answers
Once people have answered a survey, questions and answers that have responses are locked so that reports and group filters keep matching past results. You can still reorder them, add new ones, and switch a question between single and multiple choice. To fix a typo in a locked answer, add a corrected answer.
Turn off Use in this campaign to hide a survey from this campaign's new activities. archiveArchive survey hides it everywhere. More surveys lists every survey your organization has made, in all campaigns, where you can edit, archive and restore them. Activities that already use an archived survey keep working.
Use case: Recruit volunteers while you persuade. Add a single-choice question, "Would you like to volunteer with us?" Later, a group of everyone who answered Yes becomes your recruitment phonebank. Add a Notes question for the issues people raise, and read them all in the raw contact export.
Nonresponse sets
AdminOwner
A nonresponse set is the list of buttons volunteers use when they don't get survey answers. Each button has a type, and the type controls what happens to the person next.
Type
What it does
Non-response
Logged as an attempt. The person can be contacted again on a later pass. Use it for Not home or No answer.
Impression
Logged as an attempt that left an impression, like a door hanger or a voicemail. The person can be contacted again.
Do Not Contact
Marks the contact complete and removes the person from future groups and activities in this campaign.
Invalid phone
Marks the contact complete and skips the person in future phonebanks and textbanks.
Invalid address
Marks the contact complete and skips the person in future canvassing.
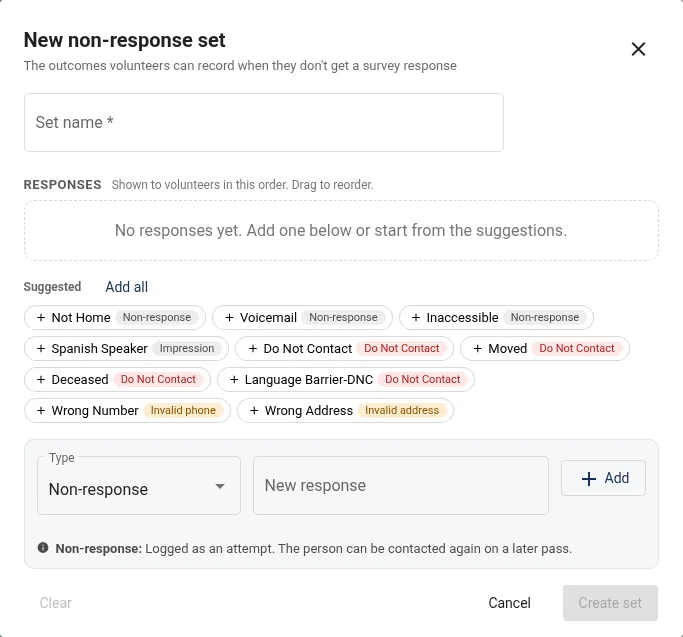
To make a set, open Nonresponse sets in the side menu and click addCreate a nonresponse set. Name it, then click suggestions to add them (or Add all), or type your own and choose a type. The suggestions are Not Home, Voicemail and Inaccessible (non-responses), Spanish Speaker (impression), Do Not Contact, Moved, Deceased and Language Barrier-DNC (Do Not Contact), Wrong Number (invalid phone) and Wrong Address (invalid address). Drag to reorder. Volunteers see the buttons in this order.
As with surveys, responses that have been recorded are locked. You can still add, reorder and rename unused ones. More nonresponse sets lists all of your organization's sets, with archive and restore.
lightbulb
Use case: Track literature drops. Add an Impression called "Door hanger". When nobody answers, canvassers leave literature and record it. The household stays available for the next pass, and summaries show how many homes got your literature.
Creating a nonresponse set. Click a suggestion to add it.
Groups: choose who to reach
AdminOwnerLite plan or higher
A group is the list of people an activity will contact. Open Groups in the side menu and click addCreate a group.
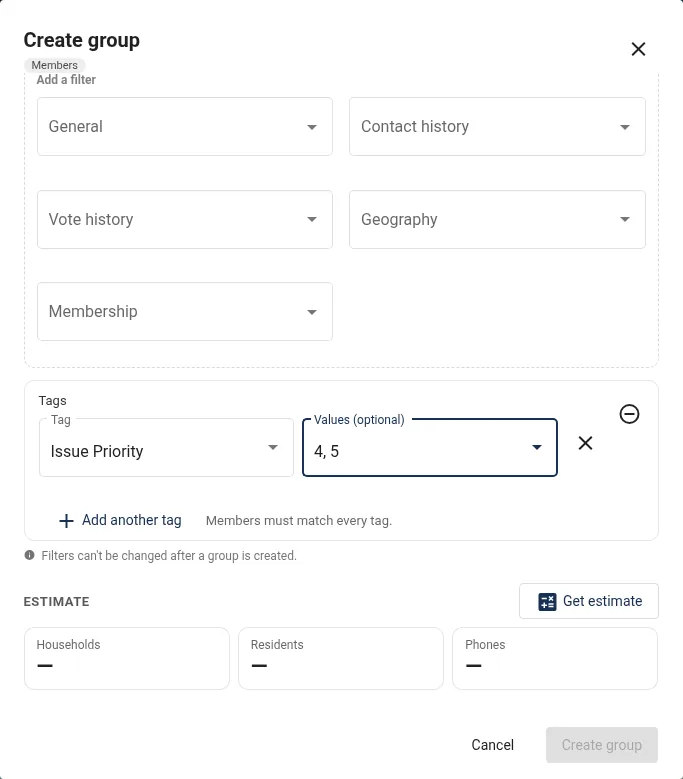
Creating a group: who to target, filters and an estimate.
Name the group.
Under Who to target, choose:
Voter individuals: one row per registered voter.
Voter households: one row per address. Contacts reach everyone living there.
Community member list: people from your organization's Community Lists. Turn on Entire membership list to include members outside the campaign district.
Add filters from the pickers (listed below). For each filter, choose its values. To start from an existing campaign-wide group's filters, use Start from a campaign-wide group.
Click calculateGet estimate to count households, residents and phones. A map previews the result. Nearby pins group into numbered circles, and the control in the top right switches between Streets and Satellite. Textable counts phone numbers, leaving out landlines and numbers that failed before. A number shared by several people counts once, since a textbank texts each number once. It's about how many texts a textbank will send.
Click Create group.
lock
Filters can't be changed after a group is created. To target different people, create a new group. With no filters, a group includes everyone in the campaign your organization can reach.
Available filters
General / Household
Age (Youth 18–35, Middle 36–66, Retired 67+), Race, Gender, Renter, Party (household groups use single-party and mixed-party household options), Exclude party, Exclude race, Spanish probable, Progressive and Segment (where available), Special campaign, Likely callable, Has phones, Registration date, and PDI ID list (upload a CSV).
Contact history
Date contacted; survey answers (AND, OR, NOT); survey contacts; nonresponse sets (OR, NOT); text sent; contacted by a team member; recently contacted (last 6, 12, 24 or 72 hours).
Vote history
General, primary, special and overall propensity (High, Medium, Low, None); voted in or did not vote in specific elections; and Exclude voted current cycle to drop people who have already voted.
Geography
Polygons, zip codes, cities, precincts (pick them or import a CSV) and districts.
Membership
For Community member list groups: tags, uploads, activities, texting or email consent, and whether the member matched a voter. In Tags, add one row per tag; members must match every tag. For a tag with values, pick the Values (optional) to include (No value is one of them), or leave it empty for any value. Click addAdd another tag for more.
Campaign-wide groups
Campaign data managers can turn on Campaign-wide so every organization in the campaign can see and use the group. Campaign-wide groups also act as rule sets for polygons and precinct tables. Groups made by another organization open read-only.
Manage groups
Click a group to rename it, refresh its estimate, copy its ID, or archive it. More groups lists your organization's active and archived groups with their filters and how many activities use them. Search, edit, archive and restore them there. Archived groups can't be used for new activities, but activities already made from them keep their contacts.
lightbulb
Use case: Follow up with undecided voters. After a phonebank that asks "Will you vote?", create a group with Contact history › survey answers set to Maybe, and run a follow-up canvass just for those people. Near election day, add Exclude voted current cycle so you stop contacting anyone who has already voted.
lightbulb
Use case: Reach the people you missed. Make a group with the Non-Response Sets filter set to Not Home and Date contacted set to last weekend. Call them in a phonebank, or send them a postcard.
Create an activity
AdminOwnerCore: canvass, petitionPlus: all
In the side menu, open the activity type (Phonebanks, Canvasses, Textbanks or Petitions) and click its create button. You can also click addNew on an activity dashboard. If anything is missing, Amplify lists what the campaign needs first.
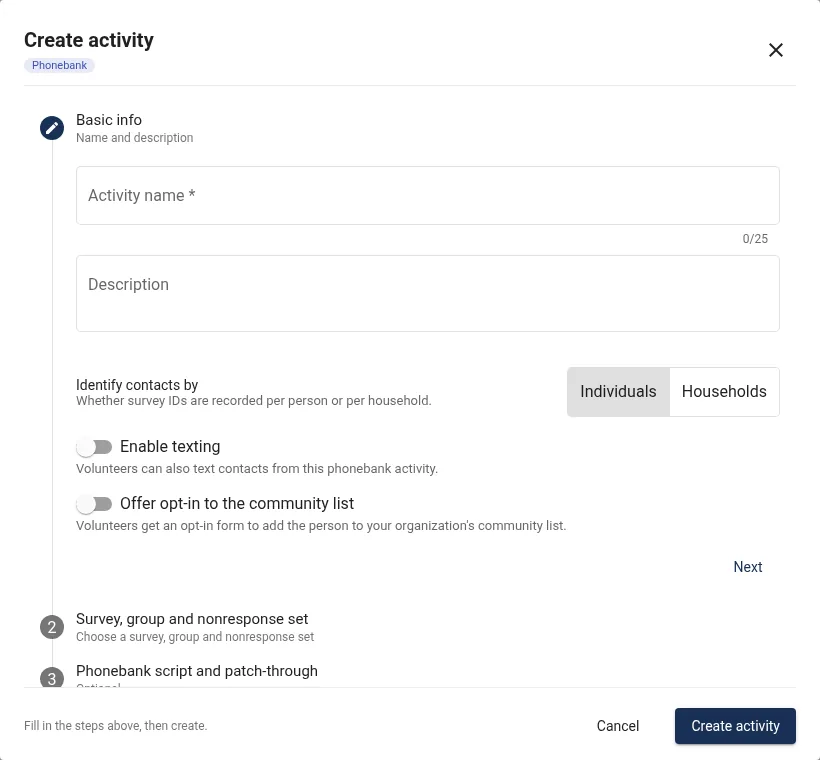
The Create activity form walks through each step.
The form has these steps:
Basic info. An activity name (up to 25 characters) and description. Choose whether to identify contacts by individuals or households. With Individuals, a household is done once everyone in it has a result. With Households, it's done as soon as one person completes the survey. A nonresponse like Not home doesn't finish the household, so the others are still contacted. Turn on Enable texting to let volunteers text people from a phonebank, canvass or petition, and Offer opt-in to the community list to show the opt-in form.
Survey, group and nonresponse set. Petitions only need a survey.
Texting details (textbanks, or when texting is on). Choose a texting operation (only active ones are offered) and the number to send from, then write the first messages, or load them from a texting template.
Petition details (petitions). Turn on Check voter file to match signers to voter records. Choose whether to ask for an address and email, and whether each is required. Zip code is always asked.
Phonebank script and patch-through (phonebanks). Paste a link to your script, such as a Google Doc, and an optional patch-through number.
Users and organizations. Choose which users and which partner organizations can work on it, or Select all users. If you leave both empty, only you and your organization can see it.
Hide survey questions (when the survey has questions). Check questions to hide them from volunteers in this activity. Leave at least one single- or multiple-choice question visible for every organization on the activity.
Hide tags (when your organization has tags). Check tags to keep them out of this activity's opt-in, new member and petition forms.
Click Create activity. Phonebanks, canvasses and textbanks show Processing while Amplify prepares the contact list. Volunteers can start as soon as it's done.
lightbulb
Use case: Answer "where do I vote?" on the spot. Turn on Enable texting and opt-ins in a phonebank, and turn on Show nearest voting centers for the campaign. When a voter asks where to vote, the caller reads the closest locations from the screen, then uses Opt in & text to send the details while they're still on the phone.
Write text messages
The message editor appears in textbanks, in activities with texting on, and in texting templates.
Type a message (up to 800 characters) and click add_circle to add it. You can add several.
Include receiver's name starts the text with "Hello" and the person's first name. Include sender's name adds "this is" and the volunteer's first name. With both on, a text reads "Hello Maria, this is Sam…". The preview shows the result.
Attach an image adds a picture. Click add_photo_alternate to upload a JPEG, PNG, GIF or WebP up to 20 MB, or paste a link in Image URL. Large photos are shrunk automatically to under 1 MB so carriers accept them. Animated GIFs must already be under 1 MB. A preview shows the attached image.
With more than one message, choose the Default initial message. Textbanks send the default to everyone. When volunteers text one person from an opt-in, they can pick any of the messages.
Quick responses (textbanks) are canned replies volunteers can tap in conversations.
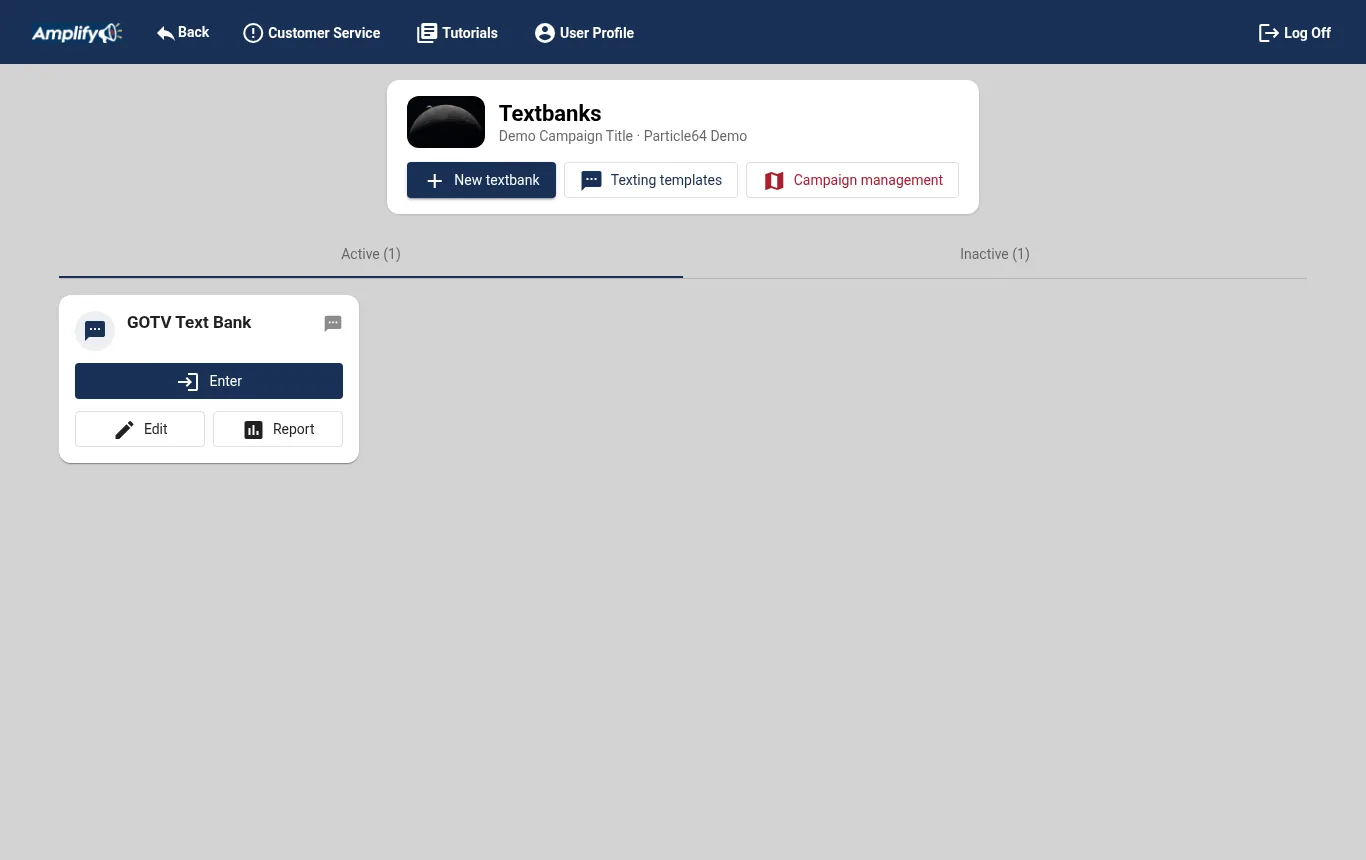
Templates save first messages and quick responses so you can reuse them. On the Textbanks dashboard, click smsTexting templates. Create, edit, duplicate and delete templates there. When you create or edit an activity, pick a template under Load from a texting template. This replaces the activity's messages and quick responses.
lightbulb
Use case: One message set for every weekend. Save your get-out-the-vote first message and quick responses, like "Here's where to vote" and "Thanks, we'll take you off our list", as a template. Every weekend's new textbank loads them in one click, with no copying and pasting.
Send a test text
AdminOwner
On a textbank's card (or any activity with texting on), click sms. Enter your mobile number, pick a first message if there are several, and click sendSend test text. Names are filled in with yours, and replies to test texts aren't recorded.
Edit, reset or close an activity
AdminOwner
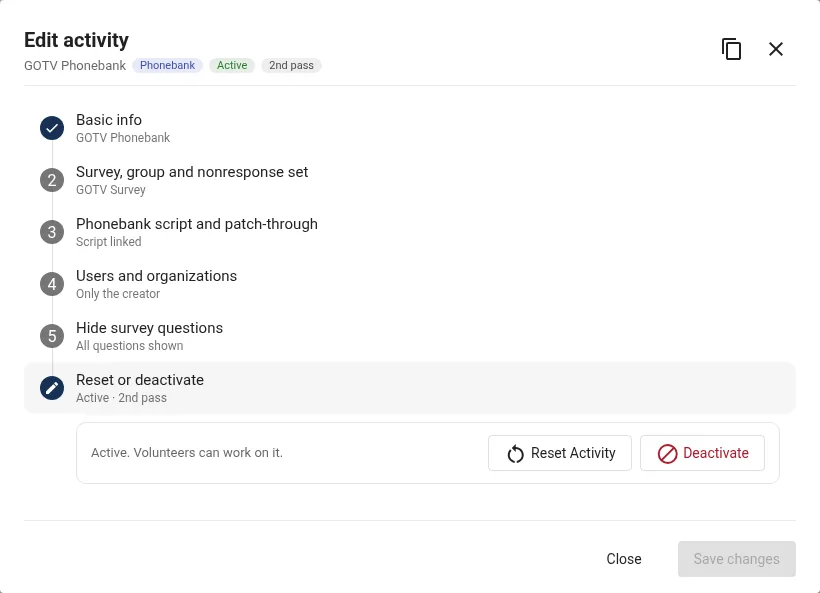
Click editEdit on an activity card, or click its name in the campaign side menu. You can change:
Editing an activity.
The name, description, texting and opt-in options.
Texting details, the script link and the patch-through number. Only active texting operations are offered. If the activity's saved operation has gone inactive, it's still listed, marked (inactive).
Which users and organizations can work on it.
Volunteer sign-up link. Click linkGet link and copy it. New volunteers who open it join this activity directly. Anyone who signs in through the link is added to your organization as a volunteer without an approval request, so share it only with people you want on the team.
Hide survey questions. Check questions to hide them from volunteers in this activity only.
Hide tags. Check tags that volunteers shouldn't be offered in this activity.
The survey, group and nonresponse set can't be changed after the activity is created. Click content_copy to copy the activity's ID.
Passes
Phonebanks, canvasses and textbanks work in passes, shown as 1st pass, 2nd pass and so on. When a pass is done, open the Reset or deactivate step of Edit activity. restart_altReset Activity starts the next pass: households that weren't completed (for example, people who were Not home) become available again. Completed households stay done, and so do households whose last outcome was Inaccessible. In textbanks, households where everyone already replied or finished also stay done. Callers who have the phonebank open when you reset see a notice, and their calls are recorded on the new pass.
Deactivate
blockDeactivate hides the activity from volunteers. It moves to the Inactive tab of the dashboard, where you can mark it completed or not, edit it, open its report, or Reactivate it. Textbanks are the exception: a deactivated textbank can't be reactivated. To text the same group again, click Edit on the textbank and click Clone at the bottom of the window to make a copy.
lightbulb
Use case: One survey, a shorter script for texters. Keep a single campaign survey, but use Hide survey questions in the textbank so texters only ask "Will you vote?". Callers and canvassers still ask everything, and all the answers add up in the same reports.
lightbulb
Use case: A weekend canvass in two passes. Canvass on Saturday, then Reset Activity on Sunday morning to start the 2nd pass. The doors marked Not home come back for Sunday's volunteers, and the doors you finished stay done.
lightbulb
Use case: Fill a canvass launch from your group chat. Copy the activity's sign-up link into your volunteer group chat the night before. New volunteers create an account and land straight in the right canvass. Remember that the link skips the approval step.
Search the map
AdminOwnerLite plan or higher
Use the searchSearch menu in the campaign toolbar:
Find Address On Map
Type a full address to drop a pin on it.
Find Precinct On Map
Type a registration precinct ID to outline it and zoom to it.
Voter Lookup
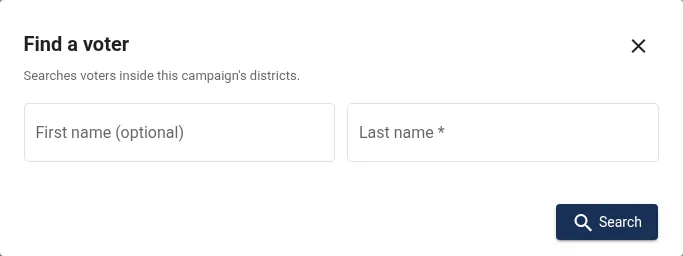
Search voters in the campaign's districts by last name, and optionally first name. Results show address, party, age and voter ID, with Show on map.
lightbulb
Use case: A voter calls the office. Someone calls to ask whether a canvasser is coming by. Use Voter Lookup to find them by name, then Show on map to see whether they're inside your turf polygons.
Voter Lookup searches the campaign's districts.
Launch checklist for election season
AdminOwner
Work through these in order. The early steps take the longest, so start them weeks ahead.
Delete phone numbers you no longer need so their monthly charges stop.
insights
Reports and data
See progress, understand your district, and export your results.
Activity reports
AdminOwner
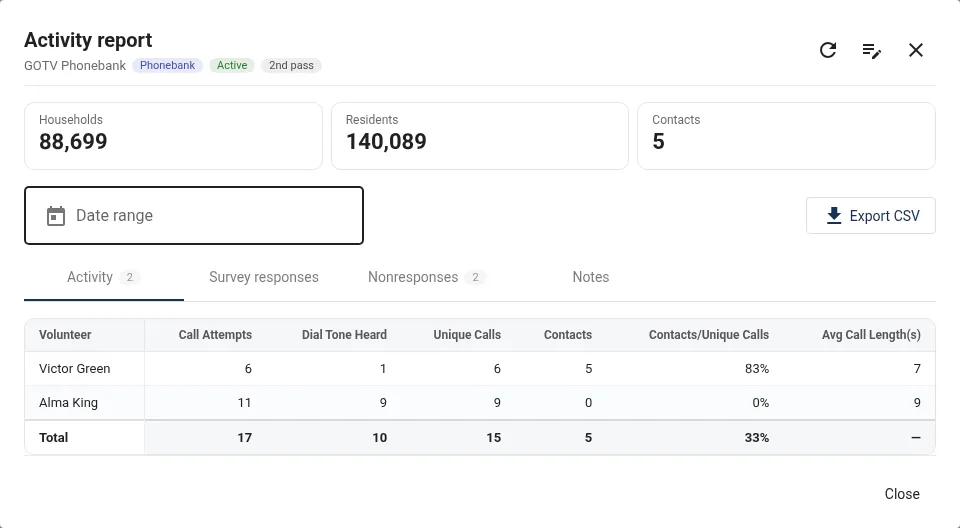
Click insert_chartReport on an activity card or next to an activity in the campaign side menu. The top shows the number of households and residents (and households per square mile for canvasses), plus the activity's contact total. The tabs show:
An activity report, showing what each volunteer did.
Activity
What each volunteer did, with totals.
Survey responses
Pick a question to see a chart and a table of how people answered.
Nonresponses
Nonresponse outcomes by volunteer.
Notes
Private notes for the activity's data managers. Type and click Save notes.
Pick a date range to filter every tab, and click downloadExport CSV to download the table you're looking at. Click refresh for the latest numbers.
Correct a response
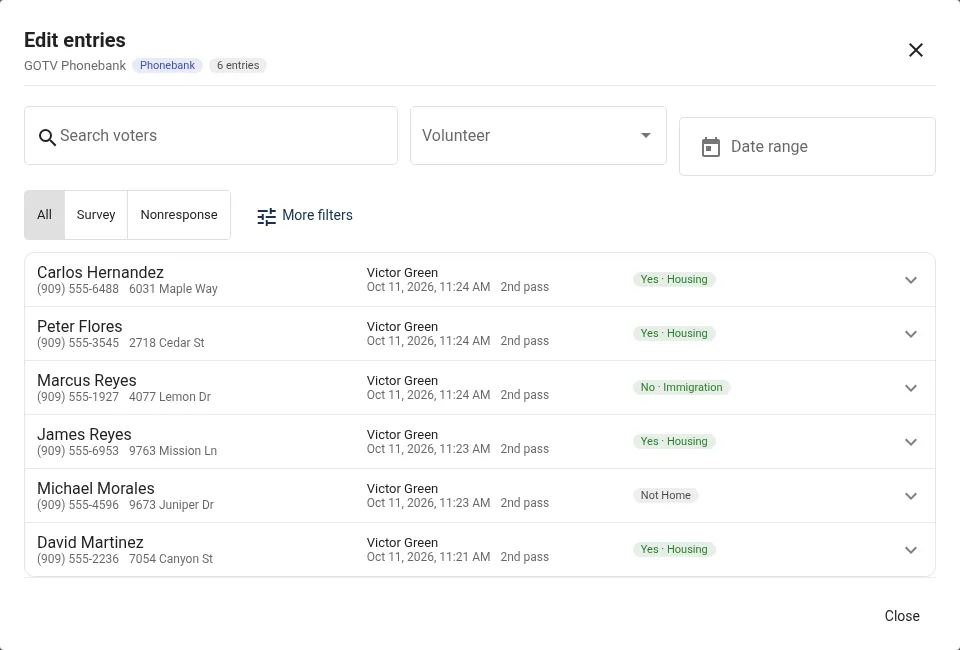
If a volunteer recorded the wrong answer or outcome, click edit_noteEdit survey responses and nonresponses in the report. It's there for activities with a survey or a nonresponse set.
Find the entry. Search voters by name, or filter by volunteer, date range, Survey or Nonresponse. tuneMore filters adds question, answer, nonresponse, phone, address, pass, notes and Edited only.
Click the entry to open it. Change the answers, or switch it to a nonresponse (or back to a survey response).
Click Save. The entry is marked Edited, and historyHistory shows who changed it, when, and what it was before.
Saved changes show in the report when you close the window. Only the response changes: the household's pass and status stay as they were.
Text replies during phonebanks
When a phonebank has texting on, the report has a sms button. It opens every text conversation from that phonebank. Filter to Awaiting reply, read a conversation, and reply from the same number.
lightbulb
Use case: Spot a stuck caller mid-shift. Open the phonebank's report during the shift. A volunteer with many call attempts and no contacts may have a microphone or connection problem. Check in with them before they get discouraged.
Edit entries: find a response by voter, volunteer, date or pass, and open it to correct it.
Campaign summaries
AdminOwner
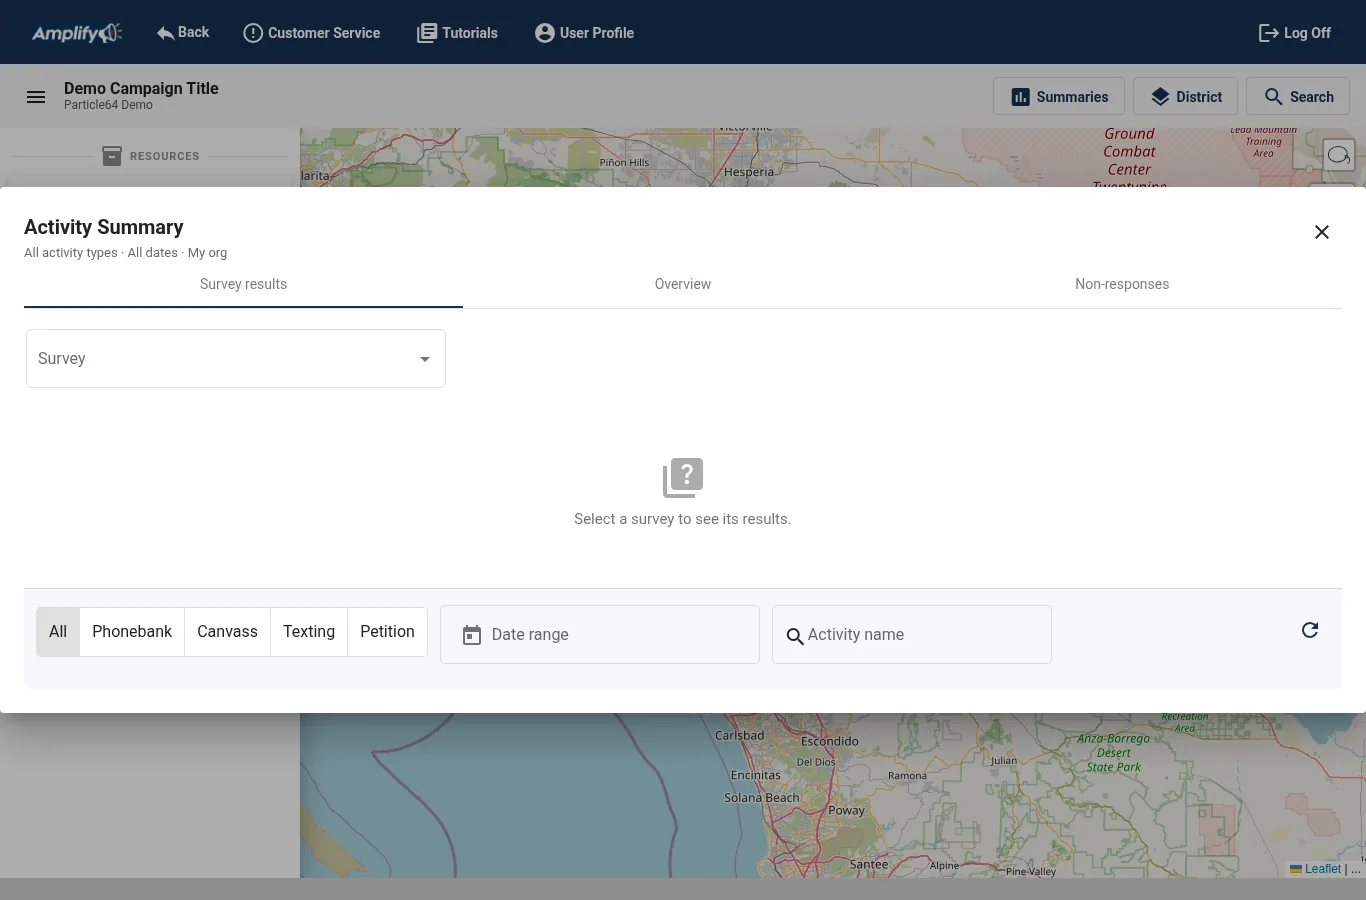
The insert_chartSummaries menu in campaign management adds up results across activities. Choose how to break them down:
Summary
One row per
User Summary
Volunteer
Activity Summary
Activity. Search by activity name.
Organization Summary
Organization in the campaign. Useful for coalitions.
Date Summary
Day. Filter to one volunteer.
Geographic Summary
City, zip code or precinct. Precinct results can be shown on the map with Display on map.
Each summary has three tabs: Survey results (pick a survey), Overview (contacts and attempts), and Non-responses (pick a set). Filter by activity type, date range, and, for data managers, My org or All orgs. Every table can be sorted and exported to CSV.
Demographic Summary
Choose a survey to see who your campaign reached across all organizations: the total universe contacted or attempted, how many gave a survey response, average age, and the share of voters of color. Charts break it down by ethnicity, gender, age, county and vote history. Switch between chart and table views.
lightbulb
Use case: Thank your top volunteers, and find the undecided. Use User Summary on Monday to see who made the most contacts last weekend, and thank them by name. Use Geographic Summary by precinct with Display on map to see where your survey answers lean undecided, and send more volunteers there.
A campaign summary with its filters.
District data and your win number
AdminOwner
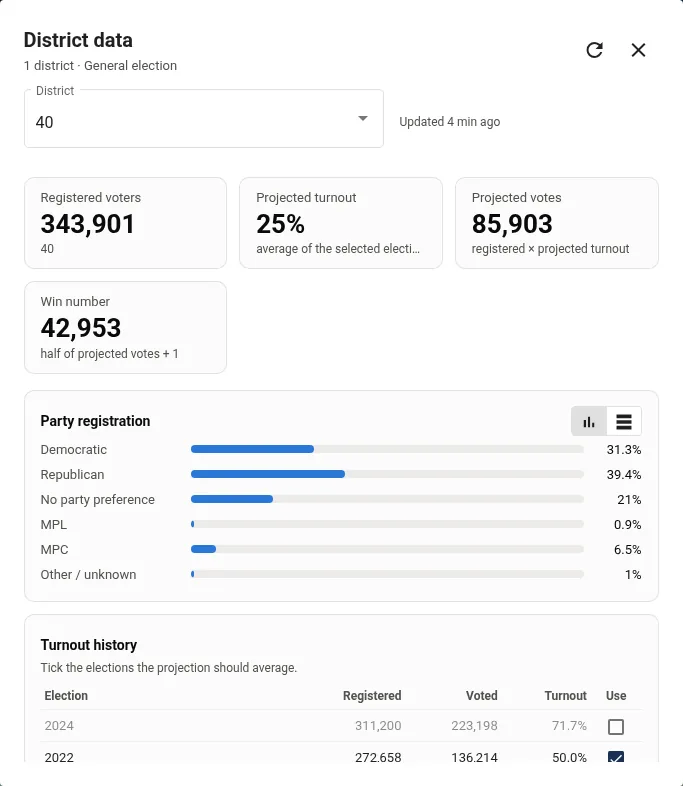
layersDistrict › District Data Summary describes the campaign's district from the voter file. Pick one district or all of them combined.
District data, with the projected turnout and win number.
Registered voters in the district.
Projected turnout: the average turnout of the elections you tick in the turnout history table.
Win number: half of the projected votes, plus one.
Party registration as a chart or a table, and turnout history by election.
With several districts, the combined view compares them side by side. Click a row to open that district. Large districts can take a minute the first time. Click refresh to recalculate.
lightbulb
Use case: Set weekly goals from your win number. Check how many votes you need, then split that across the weeks you have left. If you need 4,000 more supporters in eight weeks, your phonebanks and canvasses need about 500 a week. Activity reports show whether you're on pace.
Precinct planning
AdminOwner
layersDistrict › Precinct Planning Summary counts how many households and residents of a campaign-wide group live in each precinct, so you can decide where to send people.
Under Generate New Group By PrecinctID Table, pick a campaign-wide group. The table is saved for next time.
Click Load on a saved table. Sort by precinct, households or residents, and click search to find a precinct on the map.
Click layersDisplay on Map to shade the precincts by the group, or downloadExport Table.
Mark a table as Default to use it as the campaign's precinct shading whenever the precinct layer is on. A message confirms the change. If you see Couldn't change the default group, try again.
lightbulb
Use case: Find where your voters live. Make a campaign-wide group of low-propensity voters aged 18 to 35, generate its precinct table, and click Display on Map. The darkest precincts are where to cut your first canvass turf.
Export survey and contact data
AdminOwner
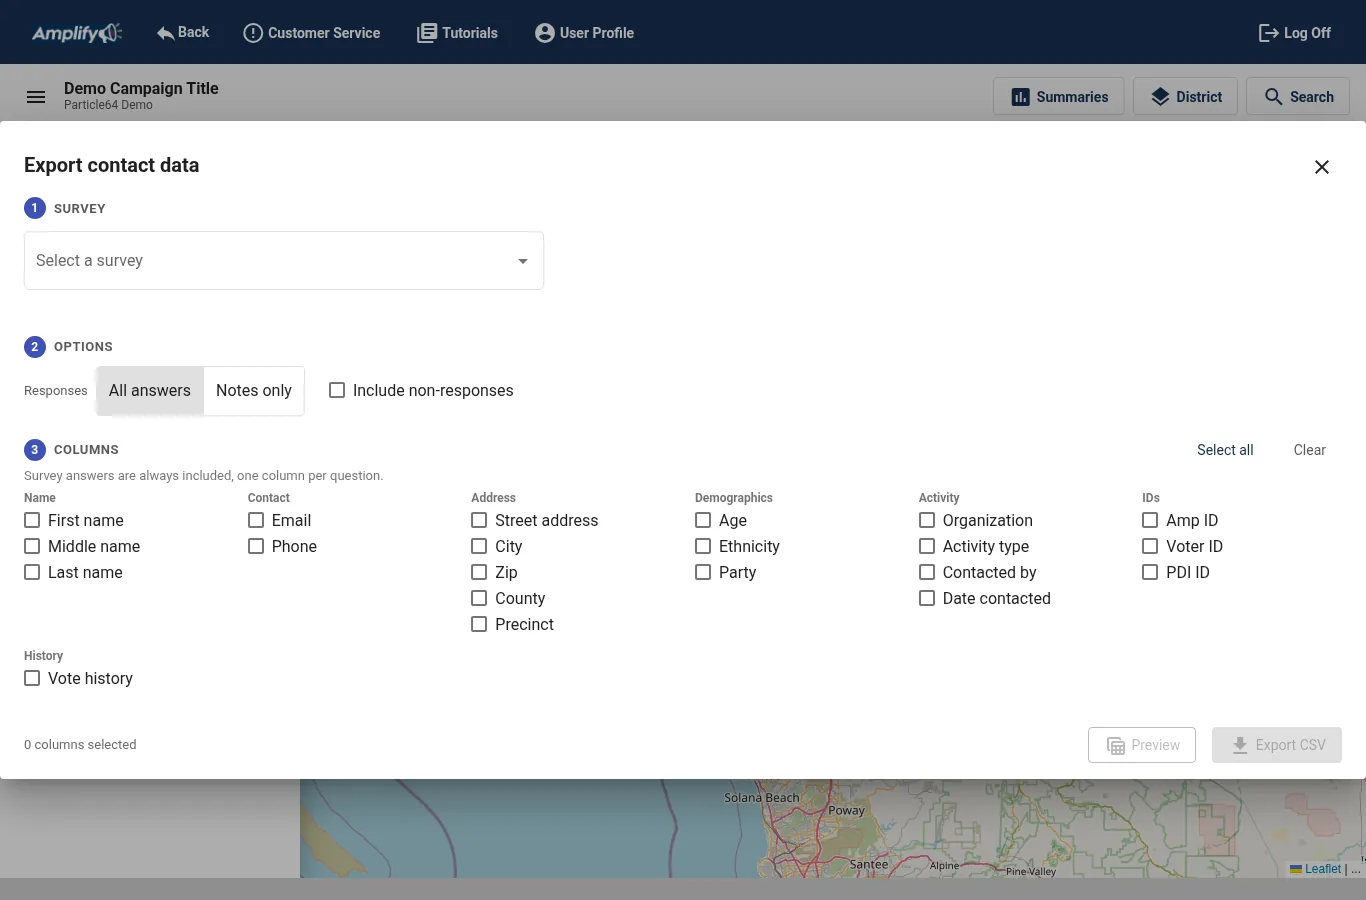
insert_chartSummaries › Export Raw Contact Data downloads every recorded contact for a survey, one row each.
Select a survey.
Choose All answers or Notes only, My org or All orgs (data managers), and whether to Include non-responses.
Choose the columns to include. Survey answers are always included, one column per question.
Click table_viewPreview to check the first rows, then downloadExport CSV.
Notes questions are only available in this export.
Exporting survey and contact data.
Export a group: phone lists and mailers
AdminOwner
layersDistrict › Export Raw Group Data downloads the people in one of your groups.
Email & phone list
One row per person who has an email or phone. Choose the columns.
Mailer
One row per household with a mailing name and address (first name, last name, address, city, state, zip). Households with several people become one family line. Not available for Community member list groups.
lightbulb
Use case: Postcards to the people you couldn't reach. Export a Mailer from your "Not Home" group. You get one line per household, with family names combined, ready to send to a mail house.
contacts
Community Lists
Your organization's own contacts: uploads, sign-ups, opt-ins and tags.
About Community Lists
AdminOwner
Community Lists hold the people your organization knows directly, separate from the voter file: members from your CRM, website sign-ups, spreadsheets, petition signers and people who opted in during an activity. Addresses are geocoded so members show on the map, and members can be matched to the voter file.
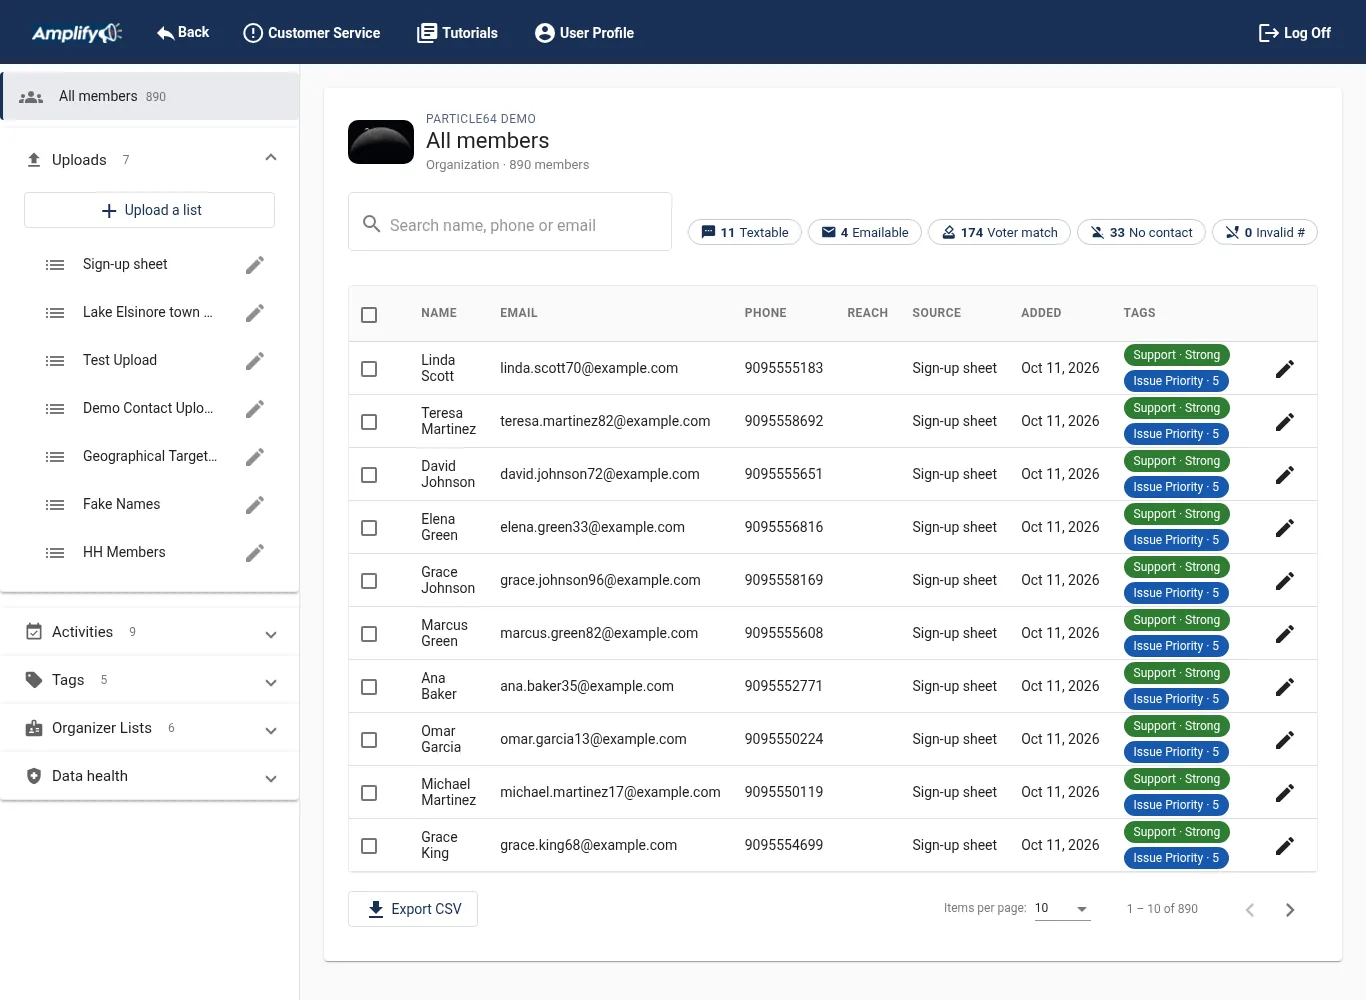
Community Lists, with the list sources on the left and summary chips above the table.
On the home page, click contactsCommunity Lists. The side panel shows every way to view your members:
All members
Everyone in your organization's lists.
Uploads
Each list you uploaded. Click edit to rename it.
Activities
People who joined through each activity's opt-ins or petitions.
Tags
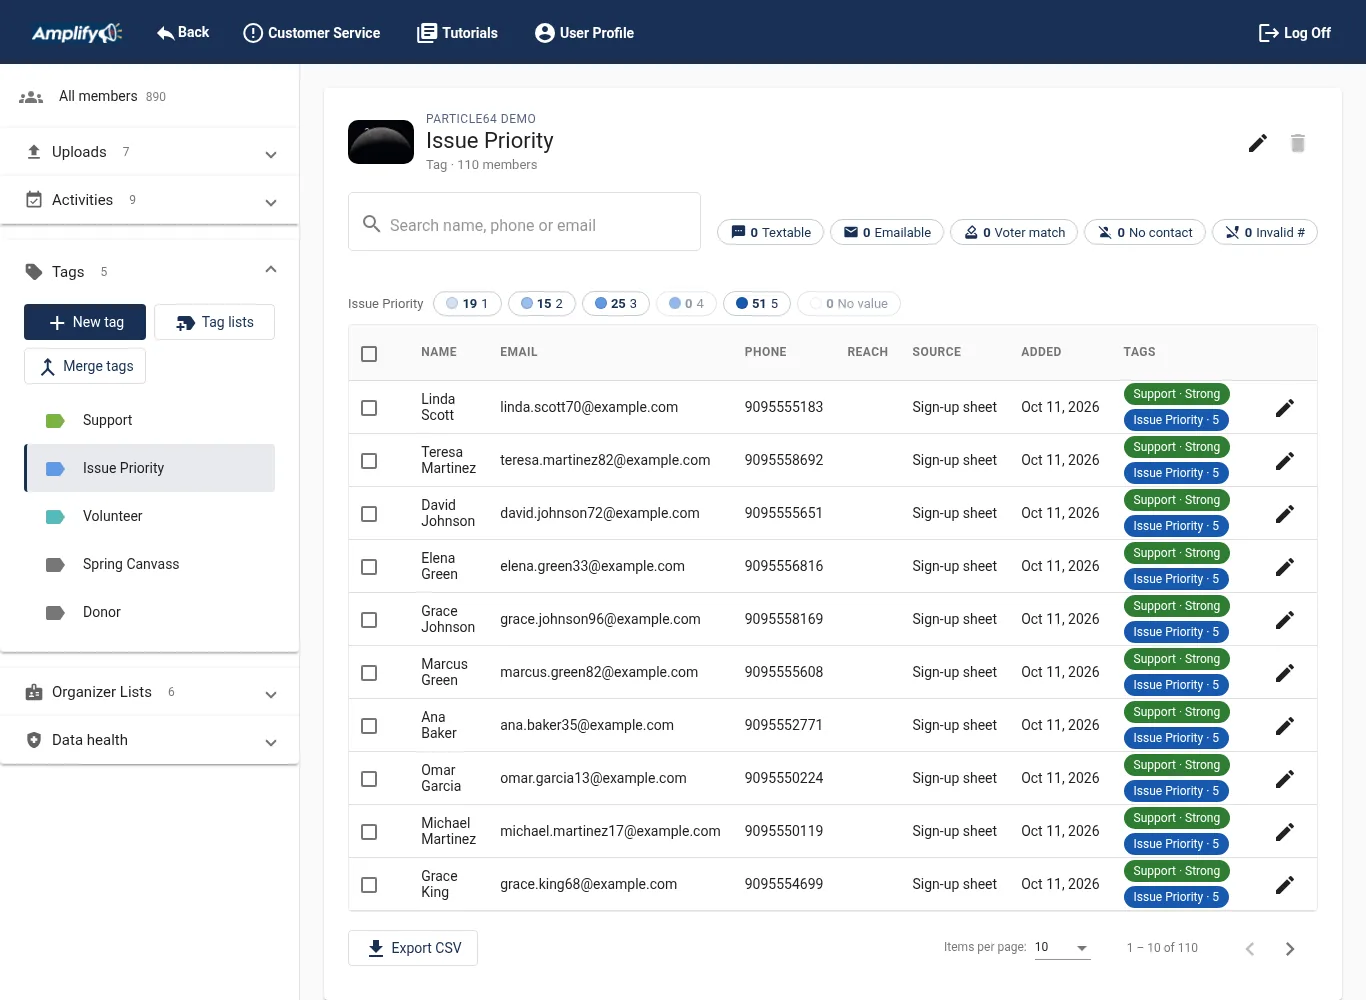
Members by tag. Create, edit, bulk-apply and merge tags here. Tags can have values, like a 1–5 score, each with its own color.
Organizer Lists
Members added by each team member.
Data health
Possible duplicates, members with no contact info, invalid numbers, and addresses that couldn't be geocoded.
To reach Community List members in an activity, create a group that targets the Community member list.
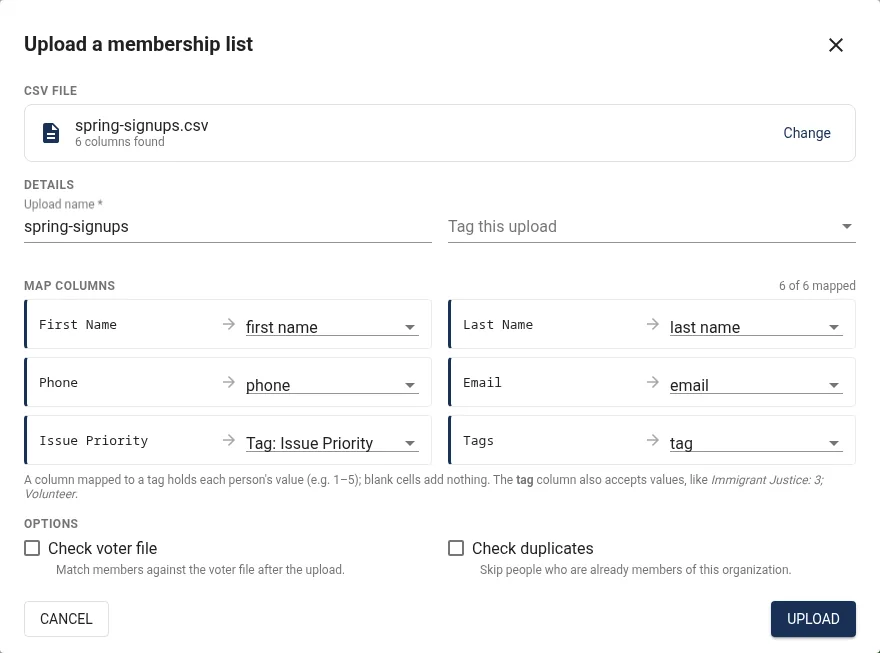
Upload a list
Under Uploads, click addUpload a list.
Drag in a CSV file or click Choose CSV file. The first row must have column headers.
Name the upload. Under Tag this upload, pick tags to add to everyone in it.
Map each column in your file to an Amplify field, or leave it as Don't import. Fields are voterID, full name, first name, middle name, last name, phone, email, address, address2, city, state, zip, ethnicity, tag and unit. Tags that have values are listed too, as Tag: name.
Choose the options:
Check voter file matches members against the voter file after the upload.
Check duplicates skips people who are already members.
Click UPLOAD.
To rename an upload, click edit next to it. To remove it, open the upload and click deleteDelete this upload.
warning_amber
Deleting an upload also deletes every member that came from it, including their tags and opt-ins. This can't be undone.
Importing tag values
Map a column to a Tag: name field when each cell holds that person's value, like 3 for a 1–5 tag. Blank cells add nothing.
The tag column also accepts values, separated by semicolons: Immigrant Justice: 3; Volunteer. This is the same format the member export uses.
A value the tag doesn't offer is imported as the tag with no value. When you open the upload, a banner lists those values so you can fix the tag or the file.
info
Map at least one column to first name, full name or voterID. Rows without one are skipped.
lightbulb
Use case: Phonebank only the members who live in the district. Upload your union roster tagged "Members 2026" with Check voter file on. Then create a Community member list group filtered to that tag. Only members inside the campaign's district are included.
Uploading a CSV file.
Find, filter and update members
Search by name, phone or email.
Click a summary chip to show only members who are Textable (opted in to texts), Emailable (opted in to email), a Voter match, have No contact info, or have an Invalid #.
Check members (or Select all) to new_labelAdd tag, label_offRemove tag, downloadExport or deleteDelete them. For a tag with values, Add tag asks which value to give them (or No value). It replaces any value they already had for that tag.
Click downloadExport CSV to download the list you're viewing.
A member's record
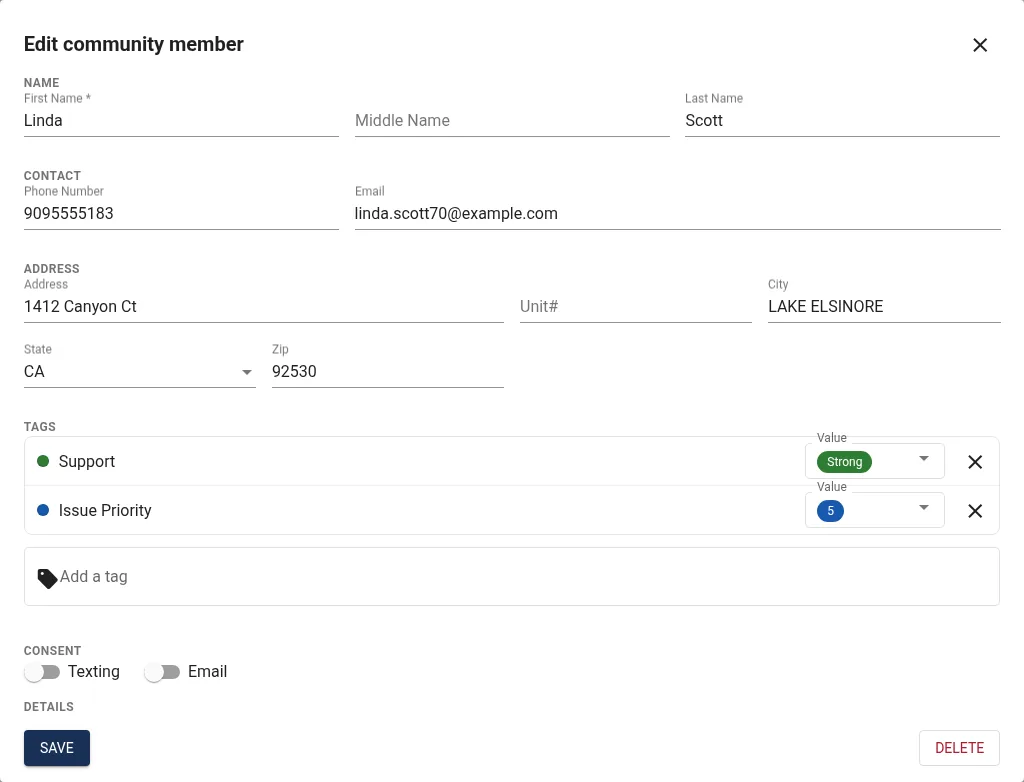
Click a member to edit their name, phone, email, address and tags, including each tag's value. Under Consent, turn Texting and Email on or off; each shows when it was last updated. Consent is set here, on each member, and never with a tag.
The record also shows where they were Added from and when, their voter ID and districts if they matched the voter file, which activities they opted in through, and a timeline of every contact: the activity, pass, date, volunteer, and their answers or outcome.
A member's record.
Tags
Tags label members, like Volunteer, Donor or Spring 2026 event, so you can target them in groups. A tag can also have values, like a 1–5 issue score or Strong, Lean, Undecided. Each member has at most one value per tag.
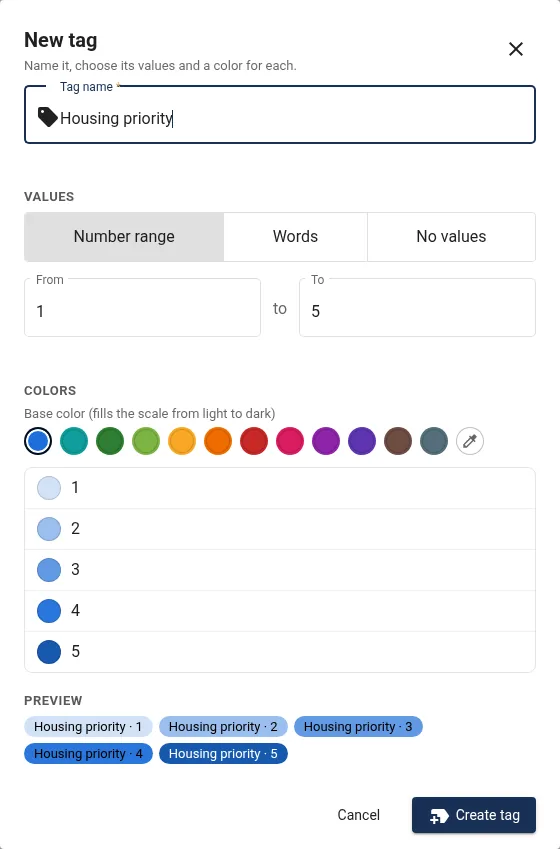
Create a tag
In the Tags panel, click addNew tag.
Type the Tag name. If it's already a plain tag, the values you choose are added to it.
Under Values, choose one:
No values: a plain tag with one color.
Number range: every whole number from one number to another, like 1 to 5. Up to 10 values.
Words: 2 to 10 words in the order you add them. Use the arrows to reorder, or click a word to rename it.
Pick a base color. It fills the values from light to dark. Click a value's dot to give it its own color, or Use scale to go back.
Check the Preview and click new_labelCreate tag.
Work with a tag
See members by value: open a tag with values. A chip for each value shows how many members have it. Click chips to show only those members, and Clear to show everyone.
Edit a tag: open it and click edit. Rename it, or change its values and colors. Before saving, Amplify shows how many members have a value you're removing (they keep the tag with no value) and how many saved groups will be updated. Renamed values follow members and groups. A saved group that used a removed value matches No value instead, so it keeps the same members.
Tag lists: tag every member of the uploads, tags or organizer lists you pick. Members in more than one list are tagged once.
Merge tags: combine two or more tags under one name. The old tags are removed from members, the tag list and saved groups. The merged tag keeps the values and colors of the first one that has them, and members keep their value if the merged tag offers it.
Hide a tag in one activity: use the Hide tags step when you create or edit an activity. Volunteers aren't offered that tag in the activity's forms. A renamed tag stays hidden, and merged or deleted tags are removed from the hidden list.
Delete a tag: open the tag and click delete. Remove it from all members first.
info
Texting and email consent aren't tags. Set them on each member's record, or with opt-ins in an activity.
lightbulb
Use case: Score members on an issue. Create Housing priority with a 1–5 range. Organizers set each member's score from their record, or import scores with an upload. Then build a Community member list group of members scored 4 or 5 and invite them to the tenant meeting.
lightbulb
Use case: Thank everyone who came to an event. After a town hall, use Tag lists to tag the sign-in sheet upload and each organizer's list as "Town Hall Oct". Then build a group from that tag and text a thank-you to everyone who opted in to texting.
A tag with values. The chips show how many members have each value; click one to narrow the list.Creating a tag with a 1 to 5 range. The base color fills the scale from light to dark.
Clean up duplicates
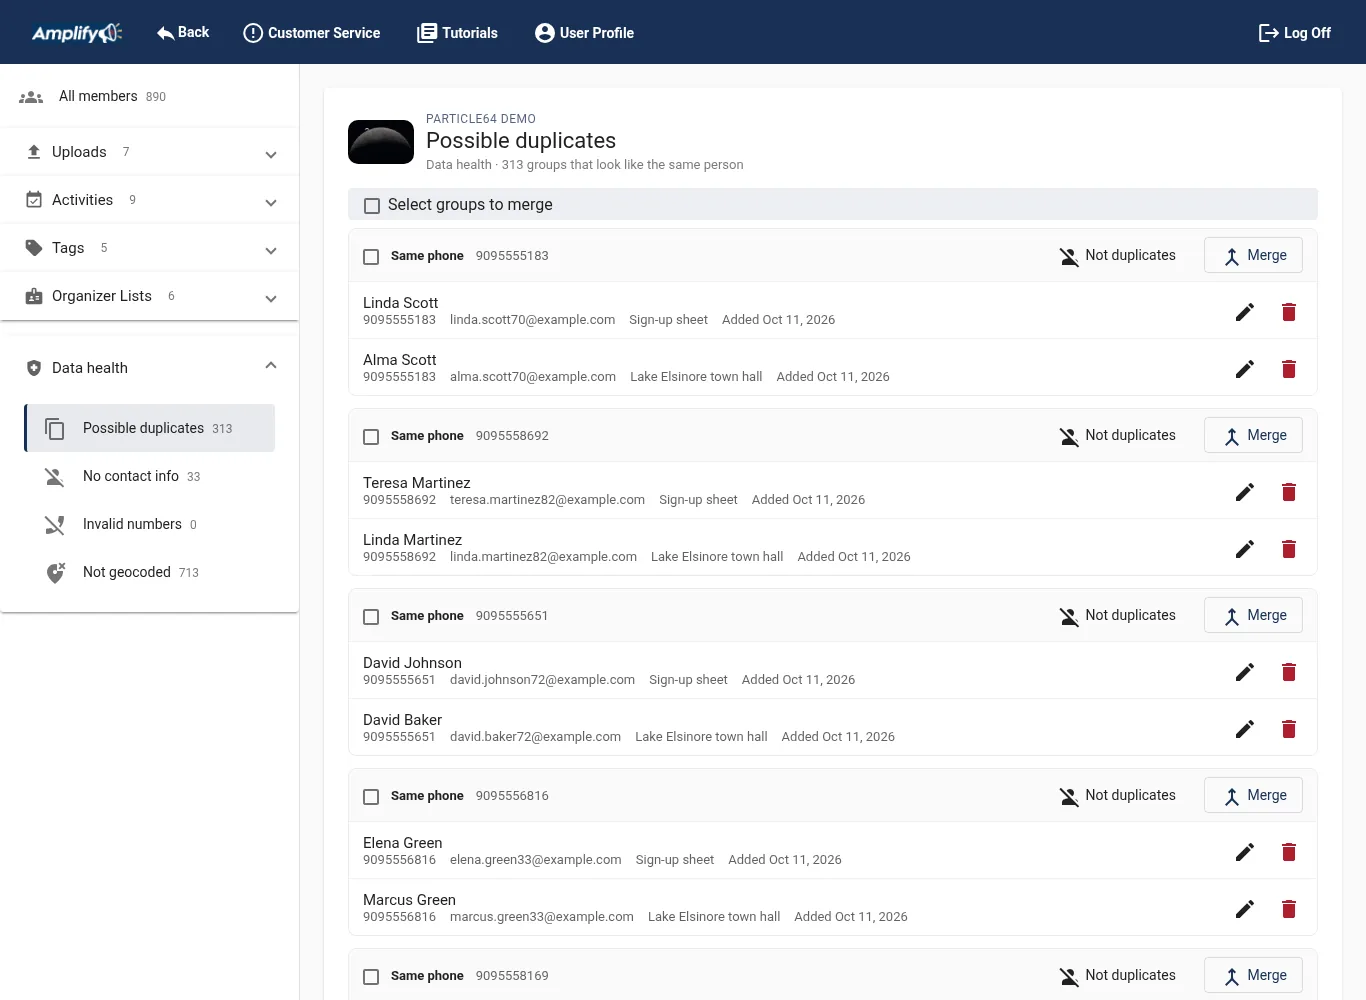
Open Data health › Possible duplicates. Amplify groups members that look like the same person and shows why: Same phone, Same email, or Same name and address. Compare their details, then:
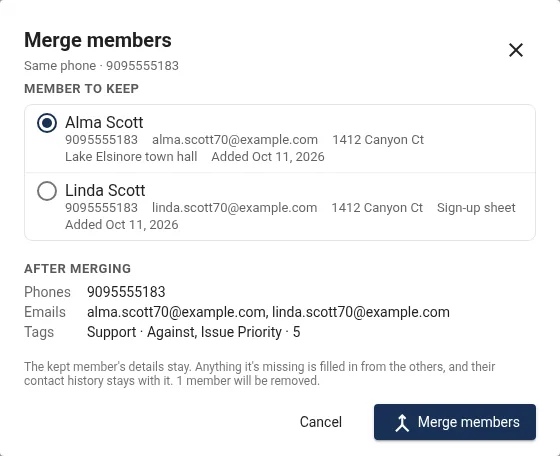
mergeMerge: choose the Member to keep. Its details stay, anything it's missing is filled in from the others, and their phones, emails and tags are combined. Their contact history moves to the kept member, and the others are removed. Check the After merging summary, then click Merge members and Confirm merge.
person_offNot duplicates: they're different people. The group stops showing as a possible duplicate.
Merge several groups at once: check the groups (or the box at the top for all of them) and click mergeMerge selected. Each group keeps its oldest member.
warning_amber
Merging can't be undone. Use Merge selected only when you've checked each group.
lightbulb
Use case: Clean up after combining lists. You uploaded your CRM export and last month's sign-up sheets, and some people are in both. Possible duplicates shows each pair side by side. Merge each pair into the most complete record, so nobody gets texted twice and their history stays in one place.
Possible duplicates, grouped by the detail they share, with Merge and Not duplicates.Merging two members: choose the one to keep and check what it will have after merging.
admin_panel_settings
Administration
Your organization, team, campaigns, phone numbers and billing.
Administrative Tools
AdminOwner
On the home page, click buildAdministrative Tools. A red ! on the button means someone is waiting to join your team, or the Terms of Use need to be accepted.
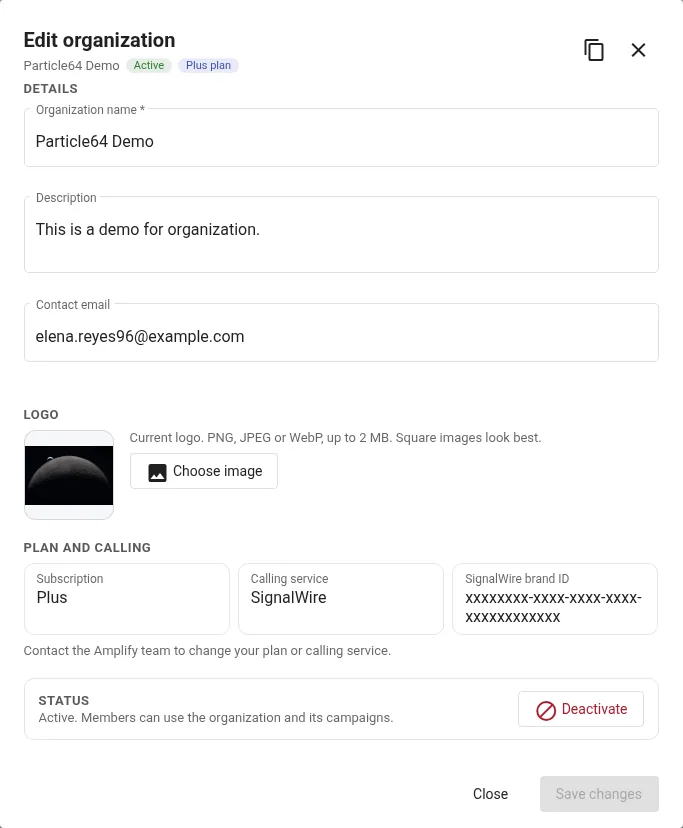
Click edit next to your organization's name on the home page. You can change its name, description and contact email, and upload a logo (PNG, JPEG or WebP, up to 2 MB; square images look best). The logo appears on the home page and at the top of every activity.
Your plan, calling service and texting brand ID are shown for reference. Contact Particle 64 to change them.
Deactivate an organization
Under Status, blockDeactivate turns the organization off. Its members can't use it or its campaigns until it's reactivated with check_circleActivate. If you can't reach the setting, contact Particle 64.
Organization settings, with the logo and plan.
Team members and roles
AdminOwnerLite plan or higher
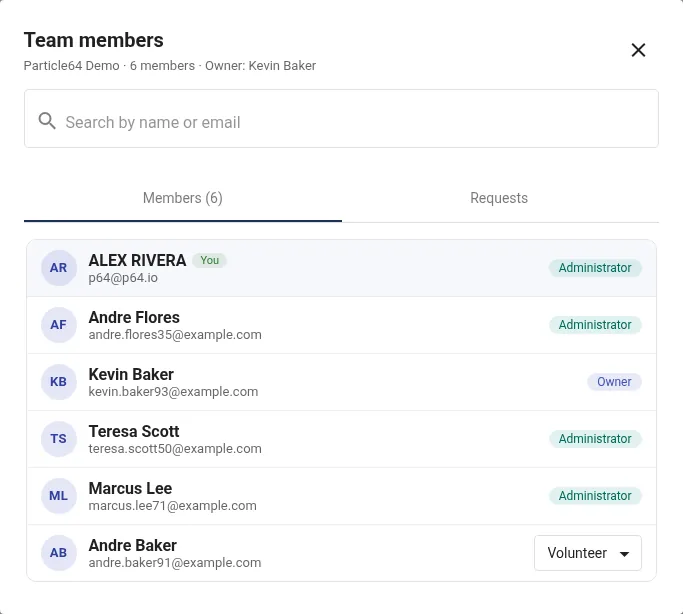
Administrative Tools › Team Members has two tabs.
Team members, with each person's role. Click a role to change it.
Approve requests
The Requests tab lists people who asked to join. Click Approve to add them as volunteers, or use the arrow next to it to approve them as administrators. Click Decline to turn them down.
Change roles
On the Members tab, click a member's role to change it, or choose Remove from organization.
Administrators can manage volunteers: change their role, make them administrators, or remove them. They can't change or remove other administrators or the owner.
The owner can change any administrator's role and can remove any other member, whatever their role.
The owner can also swap_horizTransfer ownership to another member. The previous owner becomes an administrator.
You can't change or remove your own role. That includes the owner, who steps down by transferring ownership. Each organization has one owner, set up by Particle 64.
Terms of Use
Owner
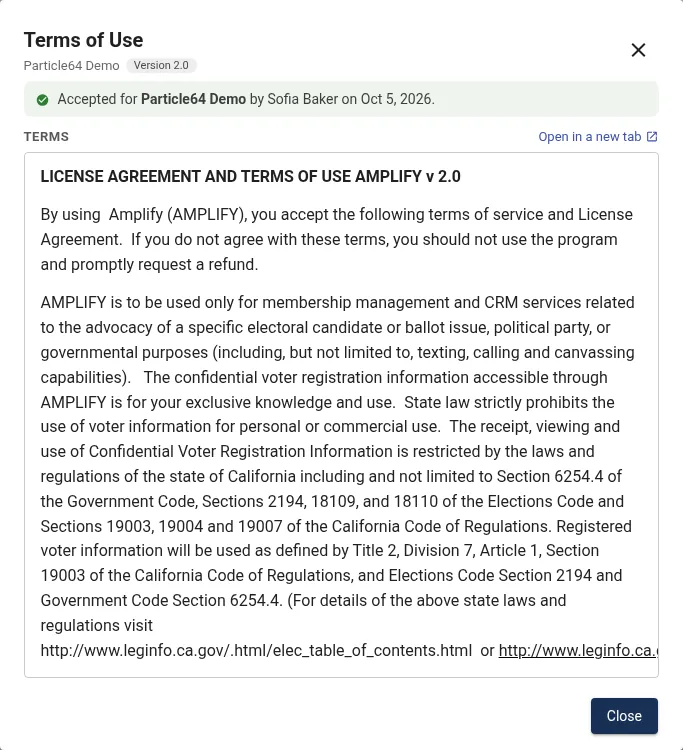
The organization's owner accepts the Terms of Use once, for everyone in the organization. Open Administrative Tools › Terms Of Use, read the terms, check I've read and agree, and click Accept. Afterward, the window shows who accepted and when. Other administrators see who needs to accept.
If the window says The terms page is currently unavailable. Please contact your administrator., try again later, or contact Particle 64.
The Terms of Use, accepted once by the organization's owner.
Manage campaigns
AdminOwner
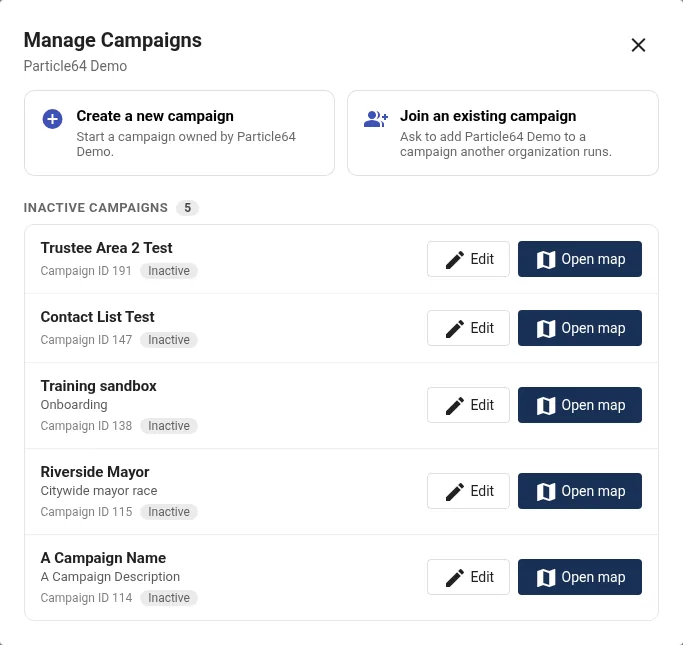
Click tuneManage Campaigns on the home page. From here you can:
Create a new campaign owned by your organization. See Create a campaign.
Join an existing campaign that another organization runs. See Coalitions.
See your inactive campaigns, and edit them or open their map.
Manage Campaigns: create, join, or reopen an inactive campaign.
Create a campaign
AdminOwner
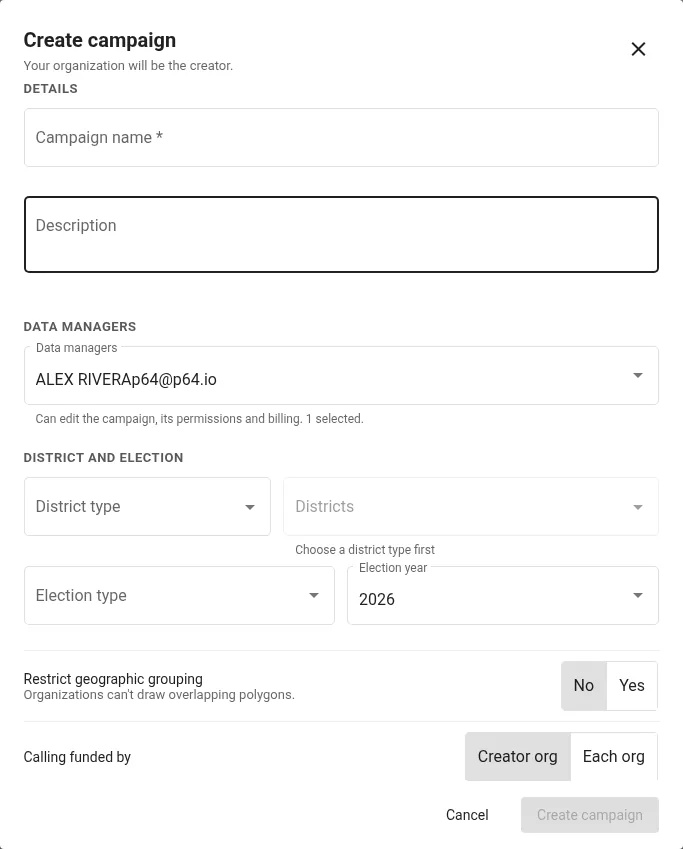
Details. Name and description.
Data managers. Choose the administrators or owners who will manage the campaign's permissions, billing and campaign-wide data. You're included by default.
District type and districts. Choose a type, such as County, Full City, City Ward, School District, Assembly, Senate, New Congressional, Board Of Supervisors, Board of Education, Water or Statewide. Then search for and choose one or more districts. Only voters and members inside these districts are part of the campaign.
Election type and year. General, Primary, Special, Political Purpose or Nonpolitical Purpose. Choose Nonpolitical Purpose for work that isn't covered by the voter file's permitted uses. Those campaigns can only use Community List groups.
Restrict geographic grouping. Choose Yes to stop organizations in the campaign from drawing overlapping polygons, so each one gets its own turf.
Calling funded by and Texting funded by. Choose Creator org to pay for every organization's calls or texts in this campaign, or Each org to have each organization pay for its own.
Click Create campaign. It appears on your home page with a campaign ID. Next, open campaign management to add surveys, groups and activities.
lightbulb
Use case: Organizing that isn't about an election. A tenants' association organizing a building uses a Nonpolitical Purpose campaign with its own uploaded member list. It gets the same canvassing, texting and reports, and never touches the voter file.
The Create campaign form.
Edit, pause or close a campaign
AdminOwnerCreator organizationLite plan or higher
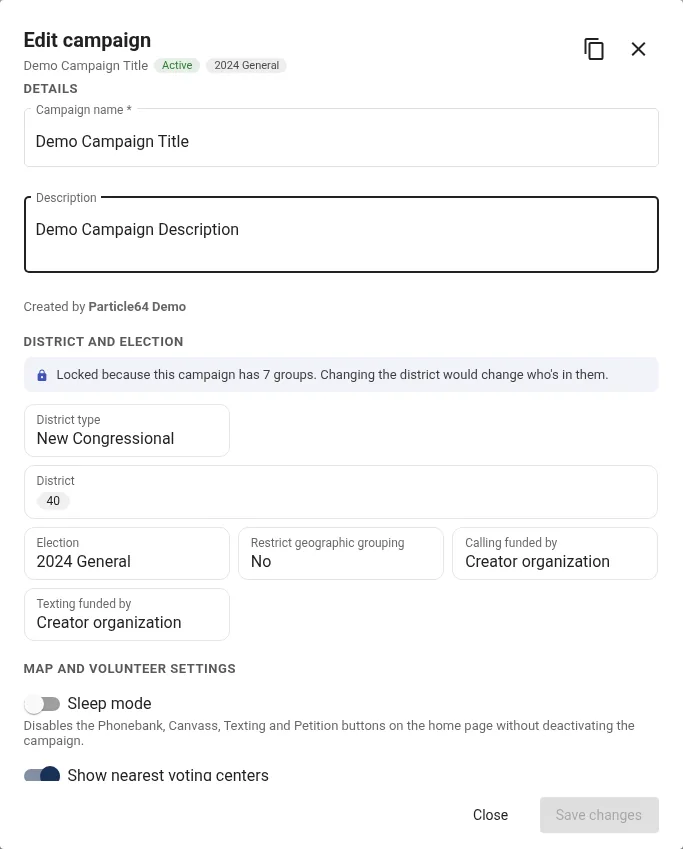
Administrators and owners of the organization that created the campaign can edit it. Data managers from partner organizations can't. Click edit on a campaign card. You can rename it and change its settings:
Editing a campaign. District settings lock once the campaign has groups.
Sleep mode
Turns off the Phonebank, Canvass, Texting and Petition buttons on the home page without deactivating the campaign. The card shows Paused.
Once a campaign has groups, its district and election settings are locked, because changing the district would change who's in them.
blockDeactivate hides the campaign from members. Inactive campaigns are listed in Manage Campaigns, where you can activate them again. An inactive campaign with no groups can be deleted.
lightbulb
Use case: Pause between the primary and the general. Turn on Sleep mode after the primary. Volunteers see the campaign as Paused and can't start new contacts, but your surveys, groups, turf and results are all kept for the fall.
Coalitions: share a campaign with other organizations
AdminOwnerData manager
Several organizations can work on one campaign. Each keeps its own members, groups and turf, and summaries can show what each organization contributed.
Ask to join another organization's campaign
Ask the campaign's data manager for its campaign ID. It's on the campaign's card.
Go to Manage Campaigns › Join an existing campaign, enter the ID and click sendSend request.
The campaign appears on your home page once it's approved.
Campaign permissions
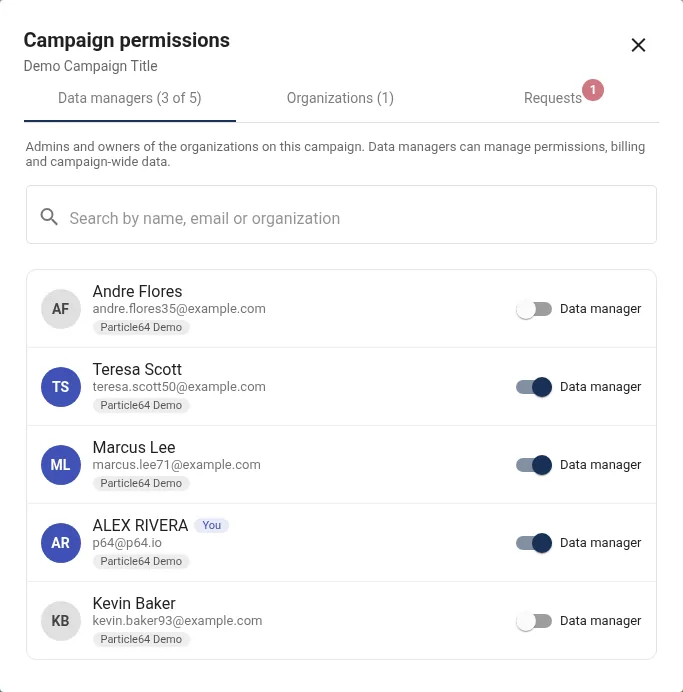
In campaign management, data managers click settingsPermissions:
Requests
Approve or deny organizations that asked to join. A badge shows how many are waiting.
Organizations
Everyone on the campaign. Remove an organization with person_remove. The creator organization can't be removed.
Data managers
Admins and owners of every organization on the campaign. Turn on Data manager for anyone who should manage permissions, billing and campaign-wide data.
When you create an activity, add partner organizations under Users and organizations so their volunteers can work on it.
lightbulb
Use case: A three-group coalition on a county measure. The lead organization creates the campaign, and two partners join with its campaign ID. A data manager shares a campaign-wide group, "Persuadable voters", and each group cuts its own turf from it. Organization Summary shows what each partner contributed.
Campaign permissions: data managers, organizations and join requests.
Phone numbers and carrier registration
AdminOwnerPlus plan
Amplify uses two kinds of numbers, and they aren't interchangeable:
Calling pool numbers place phone bank calls.
Texting numbers send and receive texts, and belong to a texting operation.
Phone carriers block or label calls and texts from unregistered senders as spam. Before you can call or text, Particle 64 registers your organization: a verified business profile for calling, and a 10DLC campaign (with Campaign Verify for political campaigns) for texting. Each approved texting registration becomes a texting operation in Amplify.
schedule
Start early. Registration can take several days. Contact Particle 64 well before you plan to call or text. The texts you send must match the samples in your registration, including images.
Your website should include this statement in its privacy policy or at the bottom of the home page:
No mobile information will be shared with third parties/affiliates for marketing/promotional purposes. All other categories exclude text messaging originator opt-in data and consent; this information will not be shared with any third parties.
If you don't have a website, let us know. We can help.
Calling pool
AdminOwnerPlus plan
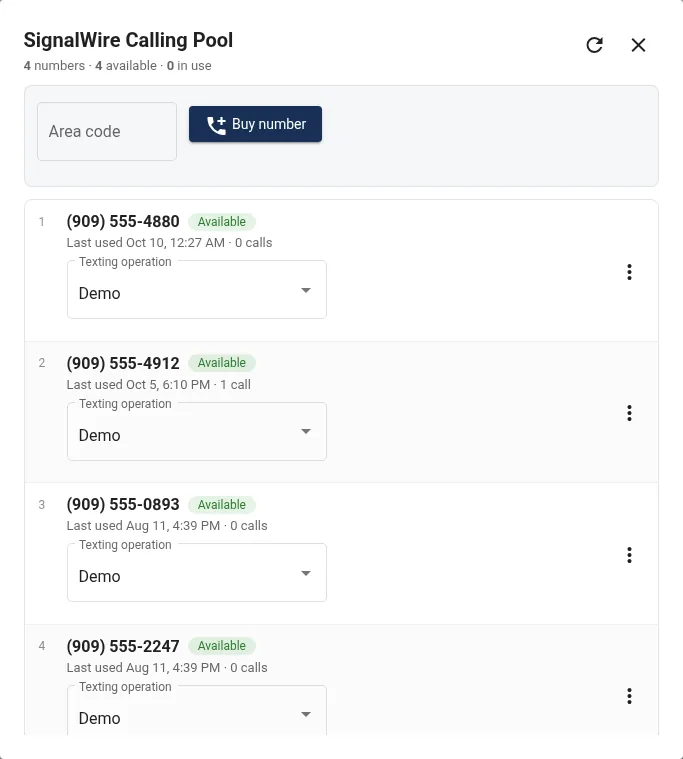
Each volunteer on a call uses one number from the pool, so buy about one number per volunteer calling at the same time. Open Administrative Tools › Twilio Calling Pool or SignalWire Calling Pool. The menu shows whichever calling service your organization uses. New organizations use SignalWire.
Buy numbers: enter an area code (and how many, if offered) and click add_callBuy number. On SignalWire, you'll see Bought and the new number, or the reason it couldn't be bought under the area code. If there are no numbers in that area code, try a nearby one. If you see The server didn't respond, refresh to check whether the number was bought before you try again.
The list shows each number as Available, In use or Not in pool, with when it was last used and how many calls it made.
Force hang up, in a number's more_vert menu, returns a number stuck In use to the pool, for example after a volunteer closed their browser mid-call.
Twilio only: you can buy several numbers at once, check marks confirm each number's carrier registration, and Force hang up all frees every number at once.
SignalWire only: each number has a Texting operation. It's the texting registration the number belongs to. Only active operations are offered.
Delete number releases a number you no longer need, and its monthly charge stops.
The calling pool, with the status of each number.
Texting numbers
AdminOwnerPlus plan
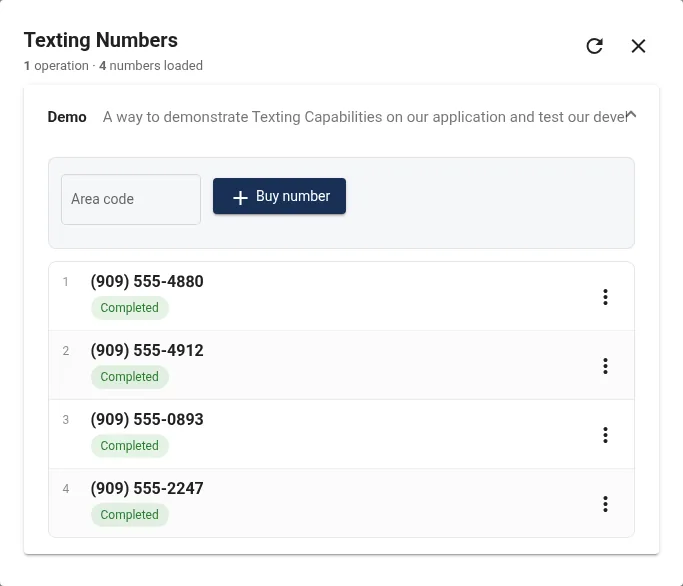
Open Administrative Tools › Texting Numbers. Each active texting operation is listed with its numbers. Inactive operations can't send texts, so they aren't shown.
Open an operation, enter a 3-digit area code and click addBuy number. When it works, you'll see Bought and the new number. If it doesn't, the reason shows next to the Buy number button. For example, if there are no numbers in that area code right now, try a nearby one. If you see The server didn't respond, refresh to check whether the number was bought before you try again.
If the number was bought but couldn't be added to the operation or set up to receive replies, a warning says so. Contact Particle 64 to finish setting it up.
Each number shows its text authorization status. A new number may take a little while to be authorized by the carriers.
Use the more_vert menu to delete a number you no longer need.
Texting numbers for a texting operation, with their carrier status.
Billing
AdminOwner
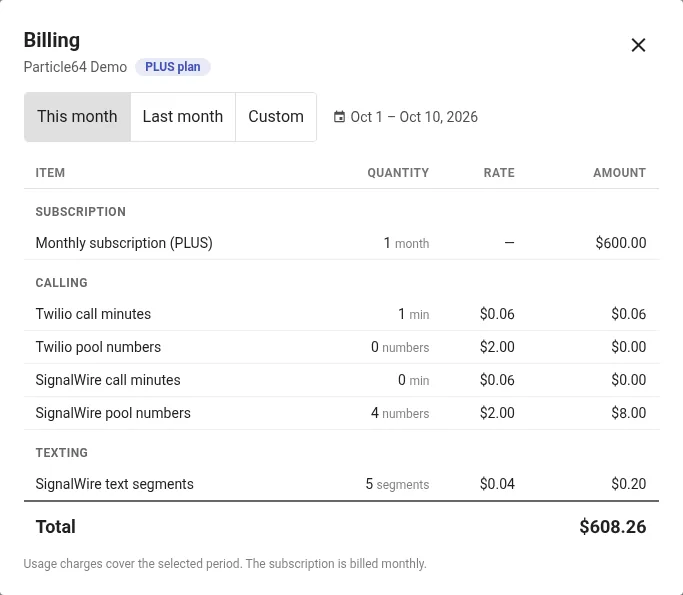
Administrative Tools › monetization_onOrganization Billing shows your organization's charges for This month, Last month or a Custom date range: your subscription, call minutes, text segments and phone numbers, each with its quantity, rate and amount. If the charges can't load, click Retry.
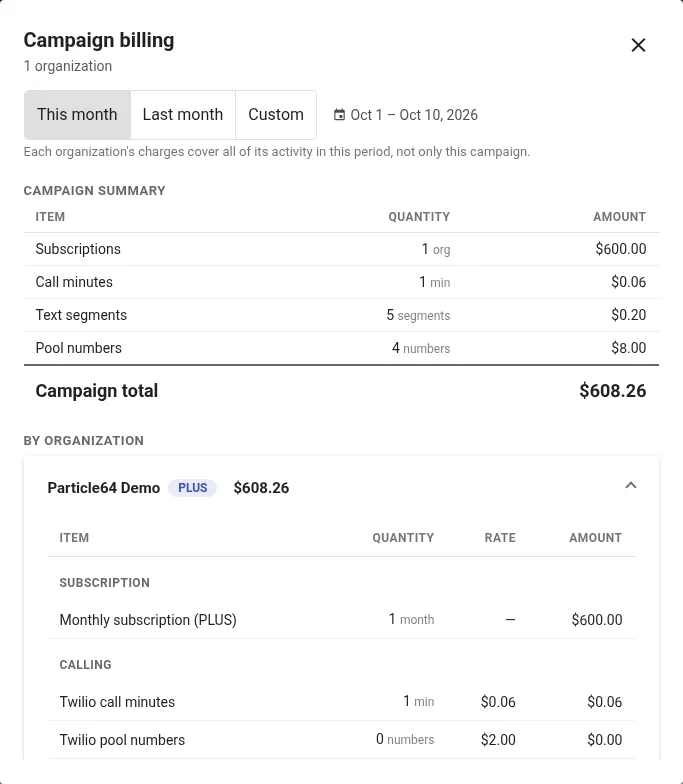
Data managers can also open monetization_onBilling in campaign management to see each organization's charges on the campaign, with a campaign total. Each organization's charges cover all of its activity in that period, not only that campaign.
Campaign billing, by organization.
gavel
Voter data and compliance
Legal access to the voter file, texting rules and costs.
Election purposes, such as communicating with voters about candidates, ballot measures, recalls, initiatives and referendums, surveying voters, and soliciting contributions or services for a campaign.
Scholarly research related to political or election activities.
Journalistic purposes related to political or election activities.
Political communication to influence public opinion on political or election matters.
Governmental purposes, such as encouraging participation in the U.S. Census.
Every organization that uses the voter file must have legal access from the Secretary of State. Particle 64 drafts the request letter for your organization to send. Your organization's owner also accepts the Terms of Use.
For work outside these purposes, upload your own contacts as Community Lists and use a Nonpolitical Purpose campaign.
Text segments and costs
Texts are billed per segment at $0.04 each:
Every 140 characters of an outgoing text is one segment. Spaces count.
An image counts as one segment.
Every incoming reply counts as a segment.
For example, a 120-character text with an image is two segments ($0.08). A 141-character text with an image is three segments.
savings
Names add characters. "Hello Maria, this is Sam" adds about 25, enough to push a 130-character message into two segments. Check the preview, and keep first messages short.
Texting best practices
Only text people who have agreed to hear from you, and record consent with opt-ins.
Say who you are in the first message, and keep it close to the samples in your carrier registration.
Honor every request to stop. Record it as Do Not Contact so nobody in the campaign contacts them again.
Text at reasonable hours in the recipient's time zone.
Fixes for common problems, a glossary, and how to reach us.
"A newer version of Amplify is available"
Amplify updates often. If your browser saved an older copy, the sign-in window says a newer version is available.
Click system_updateLoad latest version. Try it two or three times if needed.
If the message keeps coming back, clear your browser's cache for amplifyvote.com and reload:
Chrome or Edge (computer): press Ctrl+Shift+Delete (⌘+Shift+Delete on a Mac), choose Cached images and files, and click Clear data.
Safari (Mac): Safari › Settings › Privacy › Manage Website Data, find amplifyvote.com and remove it.
iPhone or iPad: Settings › Apps › Safari › Advanced › Website Data, find amplifyvote.com and delete it.
Android (Chrome): Chrome menu › Settings › Privacy and security › Delete browsing data, choose Cached images and files.
If you added Amplify to your home screen, close it completely and open it again.
If you see Couldn't reach the server instead, check your internet connection and click Retry.
Common problems
The home page says "You're signed out"
Your sign-in ended, or you opened Amplify in a new tab. Click loginSign in.
I don't see any campaigns
You may not be in an organization yet, or your request hasn't been approved. Check My Organizations. If you're in several, make sure you're in the right one.
The activity I need isn't listed
You may not have been added to it. Ask your organizer to add you under Users and organizations, or to send you its sign-up link.
The Enter button is grayed out
The activity is still Preparing contacts. Wait a minute and refresh. If it says Processing for more than a few minutes, contact us.
"This activity is no longer active"
An organizer deactivated it. Ask them which activity to use now.
My calls won't connect
Make sure your browser has permission to use the microphone (look for the camera or lock icon in the address bar), and that no other app is using it. If you see All call numbers are in use, wait a moment or ask an administrator to add numbers.
"Calling is still starting up"
Shown on the Twilio calling screen when you click Call before calling is ready. Wait a few seconds and try again. If it doesn't start, refresh the page.
"This phone number can't be dialed"
The number is invalid or not in service. Choose a non-response such as Wrong Number and move on.
"Voting locations not shown"
The address's map location is approximate, so Amplify can't tell which voting locations are nearest. In a canvass, households a canvasser added on the map always show them.
"The call wasn't answered"
The person declined the call, was busy or didn't pick up. Choose a non-response such as No Answer and move on, or try them again later.
Callers hear choppy or cutting-out audio
Usually a weak internet connection. On the Twilio calling screen Amplify warns when the connection is unstable. Close other tabs and apps that use the internet, move closer to the Wi-Fi router, or plug in a headset.
"Your calling session expired"
Shown on the SignalWire calling screen after a long session. Refresh the page to keep calling.
The canvass map is slow
Very large canvasses take longer to load on phones. Ask your organizer to split the turf into canvasses of about 1,000 households.
My location doesn't show
Turn on Share my location and allow location access when the browser asks. On a phone, also check that location services are on for your browser. Your marker can take up to 30 seconds to appear.
I can't see my teammates on the canvass map
You only see people who are sharing in the same canvass, and only while you're sharing too. Make sure everyone entered the same activity and turned on Share my location. Markers refresh about every 30 seconds.
I can't send texts
The activity needs a texting number. If it says No texting number is assigned, ask an administrator to set one in the activity's texting details.
I can't change a survey answer
Answers that already have responses are locked so past results stay accurate. Add a new answer instead. See Surveys.
What's the difference between a household and an individual?
Household groups and activities treat everyone at an address as one stop. Individual ones treat each person separately. Use households for canvassing, and individuals when every person needs their own contact.
Can I undo a Do Not Contact?
Contact us and we'll help. Do Not Contact responses can't be edited in the app.
Can other canvassers see where I am?
Only if you turn on Share my location, and only other canvassers in the same canvass who are sharing too. Stop sharing and your marker is removed.
Who can see my organization's data?
Only members of your organization, based on their role. In a shared campaign, the campaign's data managers can see results from every organization on it. Your Community Lists stay private to your organization.
Glossary
10DLC
The U.S. carrier registration system for texting from regular 10-digit numbers.
Campaign ID
The number on a campaign's card. Other organizations use it to ask to join.
Campaign-wide group
A group every organization in the campaign can use.
Community Lists
Your organization's own contacts, separate from the voter file.
Data manager
A campaign permission for managing permissions, billing and campaign-wide data.
Geocoding
Turning an address into a point on the map.
Impression
A nonresponse that left something behind, like a door hanger.
Pass
One time through an activity's list, shown as 1st pass, 2nd pass and so on. Resetting the activity starts a new pass for people who weren't reached.
Patch-through
Transferring a phone bank call to another number.
Propensity
How often someone votes, based on recent elections: High, Medium, Low or None.
Precinct
A small voting area defined by the county registrar.
Segment
The billing unit for texts: 140 characters, one image, or one incoming reply.
Sleep mode
Pauses a campaign's activity buttons without deactivating it.
Texting operation
An approved texting registration, with its own numbers.
Win number
Half of the projected votes in a district, plus one.
Get help
Support comes straight from the engineers at Particle 64 who build and host Amplify.
From inside Amplify: click error_outlineCustomer Service in the top bar. Describe what happened, what you expected and the page you were on, and include a phone number if you'd like a call back. We'll reply to the email you sign in with.